The hot wire is the absolute classic when it comes to electrical games. But hot wire is not the same as hot wire, because there are many different circuits and types. On this page I would like to introduce you to more than 15 circuits and many different types of hot wire.
How do you play with the hot wire?
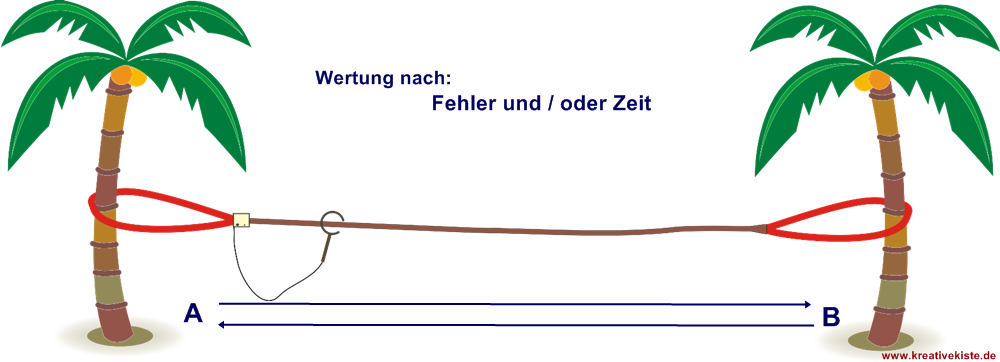
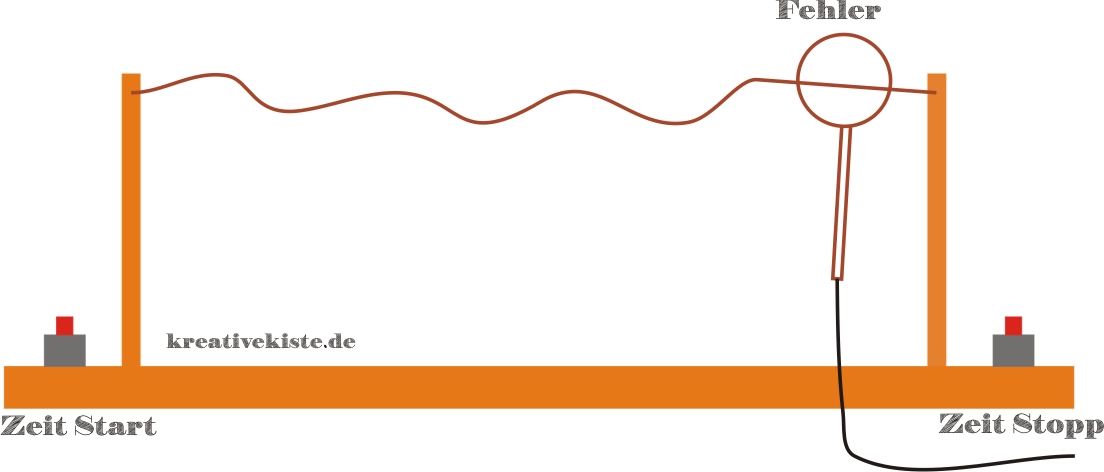
The hot WIRE is a game of skill. The goal is to guide a wire eyelet over a straight and / or curved wire from point A to point B without touching it. To make the game even more exciting, the time can be stopped and the errors counted. If you want, you can also extend the game by going back from side B to side A.
Build a hot wire
The game can be built with a tube, a wire, or a rope in a wide variety of shapes, colors and variations. Here are a few examples:
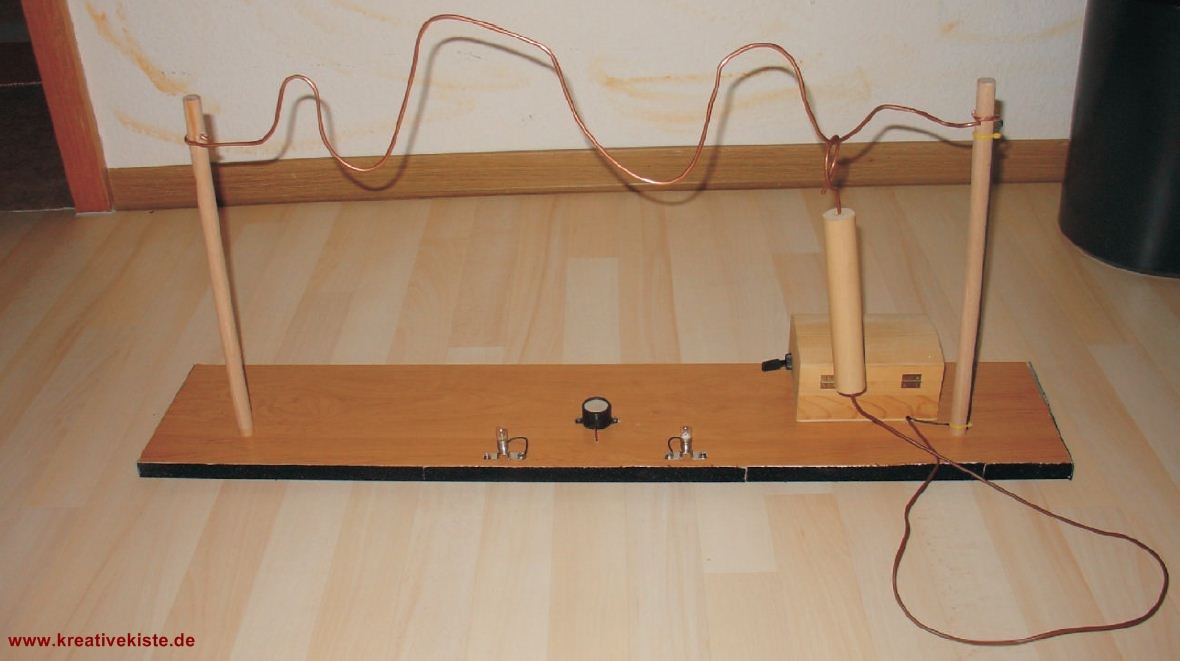
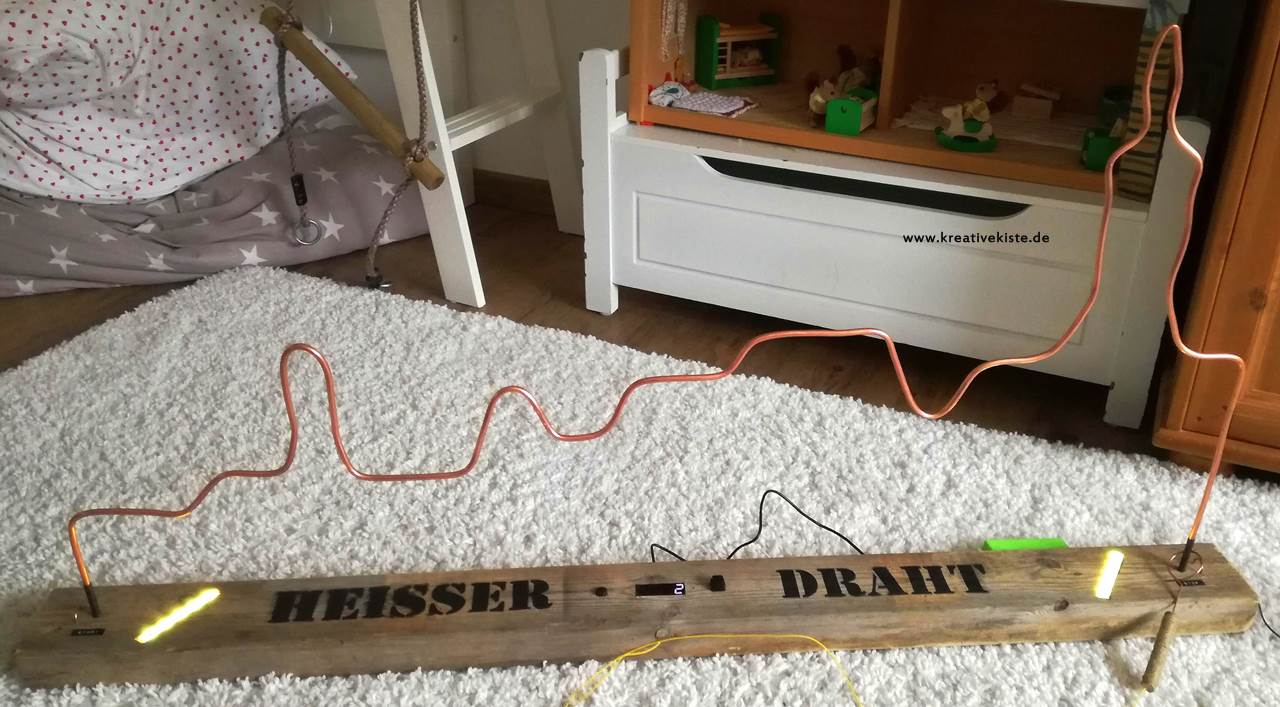
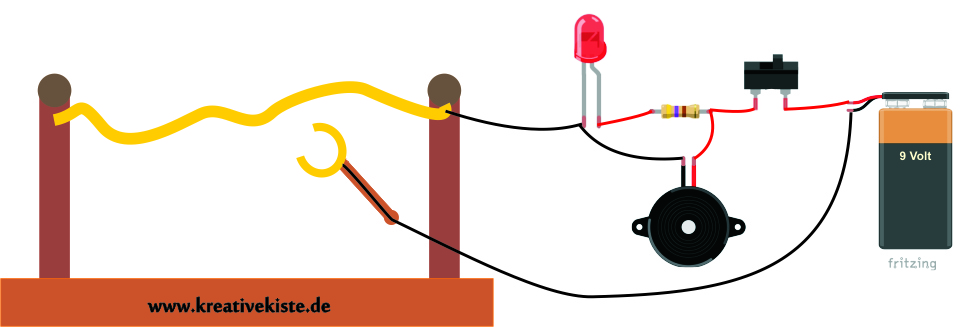
The classic: The hot wire is stretched between two logs that are attached to a wooden plate. The error is indicated by a buzzer and two e10 lamps. The circuit and the battery are housed in a small wooden box. A very simple and great handicraft work, not only for small hobbyists. All you need is a bit of wire, three logs, a base plate and a bit of electronics.
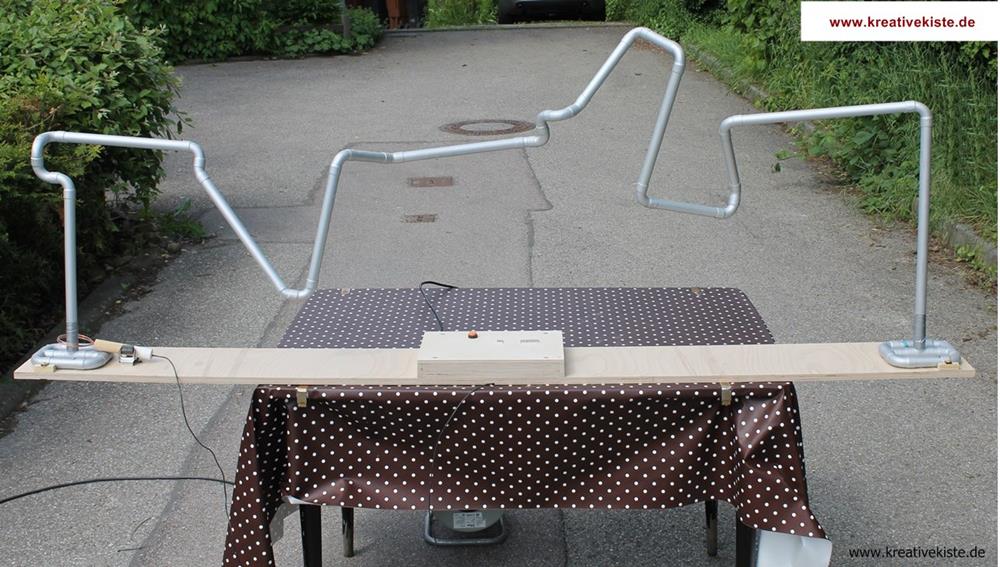
The longest: I have ever built was 5 meters long. The game consists of a 6mm stainless steel rope that can withstand any weather for a long time. The rope is tensioned with tension belts that are attached to two trees. The circuit is housed in a junction box attached to the cable. The particular difficulty is keeping the eyelet straight when running.

Hot wire or pipe, with (press) fittings from the installation area. Who wants to build a nice or "angled" hot wire but has no way to bend pipes. He can buy fittings and the right pipe in many hardware stores. Since these have to be pressed with a special press, there should be a suitable press to borrow at the hardware store. This means that xxl wires can also be built or complex shapes can be realized.

Hot wire with (solder) fittings from the installation area. The advantage over pressing is that a torch for soft soldering only costs around 20 euros. Disadvantages are that a flux has to be used for the solder and it is difficult to get it back afterwards and that only copper pipe can be soldered. I sprayed the game with zinc spray afterwards to make it look better. However, this does not work with all sprays, I had to try a few until the conductivity was right. This hot tube game was 4 meters long and is built with 28mm fittings and tube.

The simplest: In cooperation with the elementary school, I built this simple electronic game. Since the third graders did not have to solder, the task of building a hot wire could be easily solved. -> Here you can find the instructions I used in school, so everyone can build a hot wire.
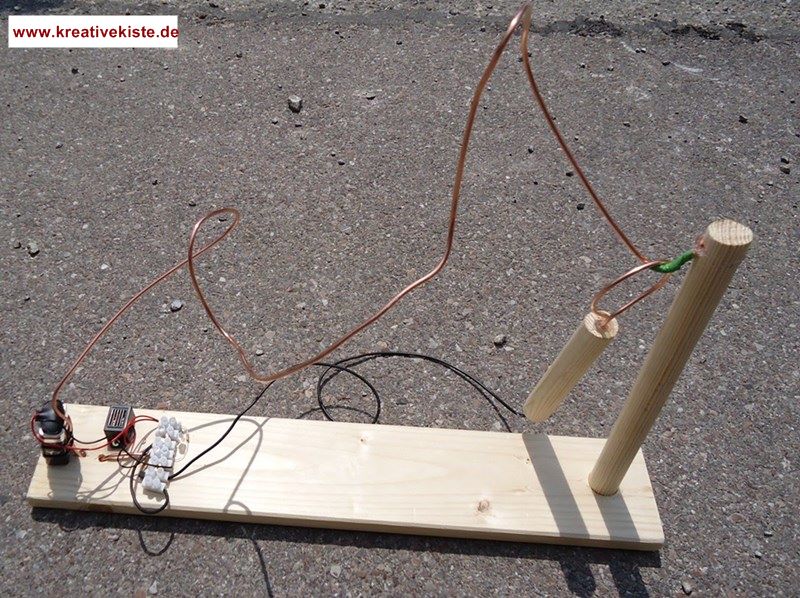
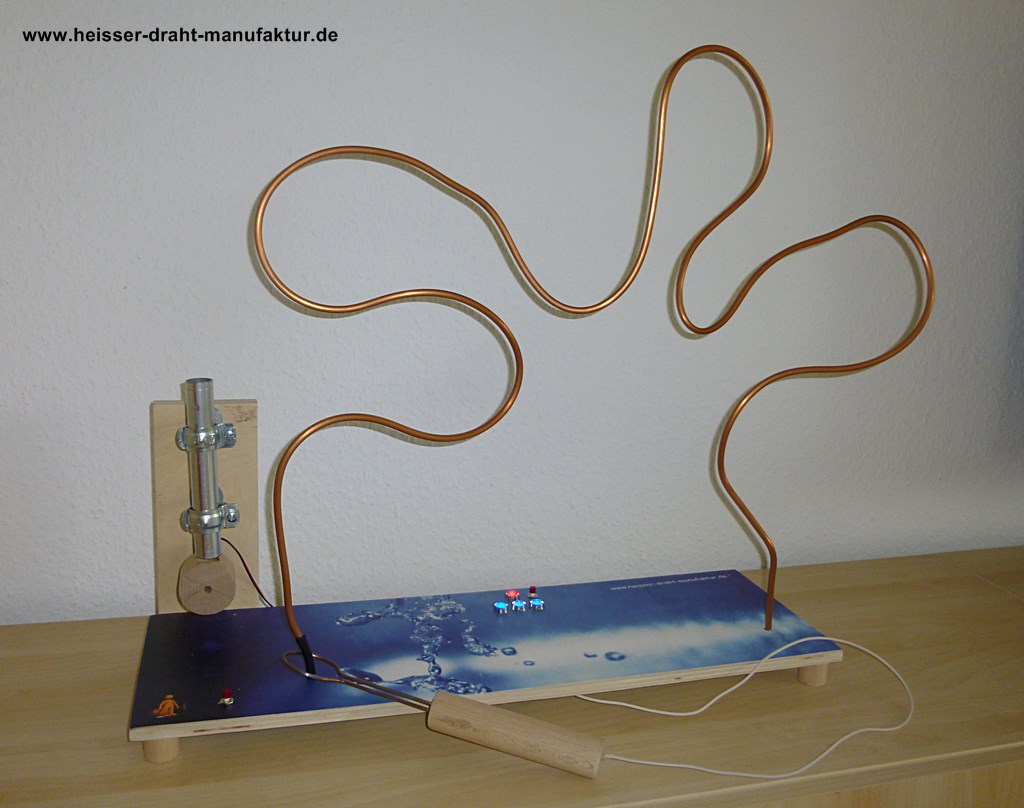
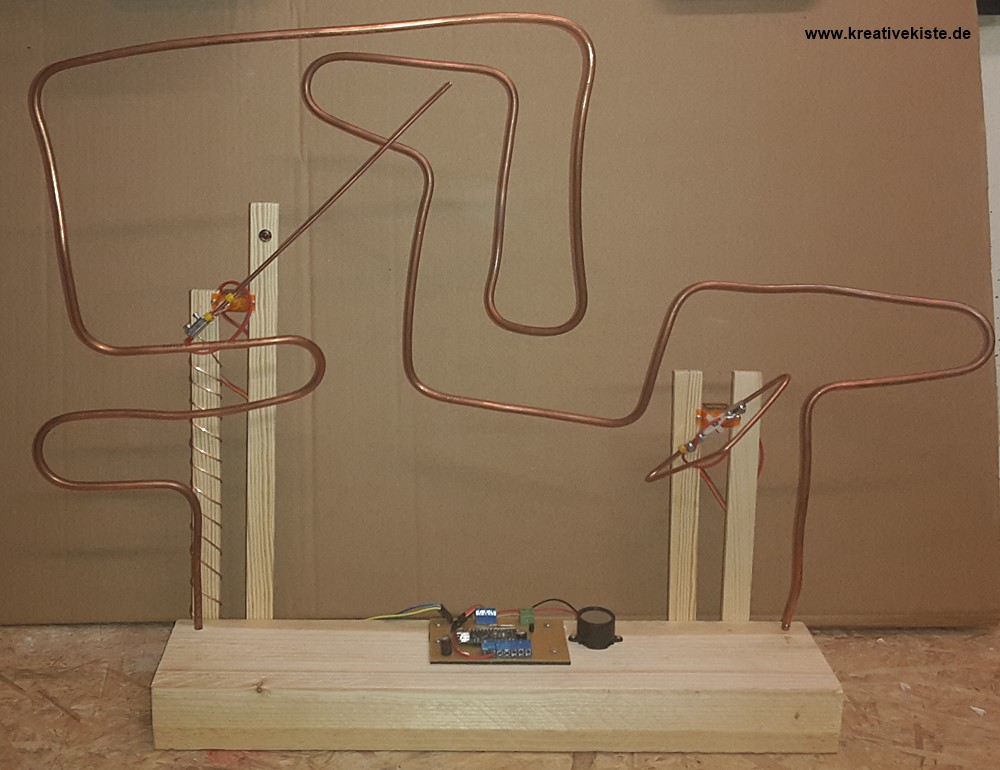
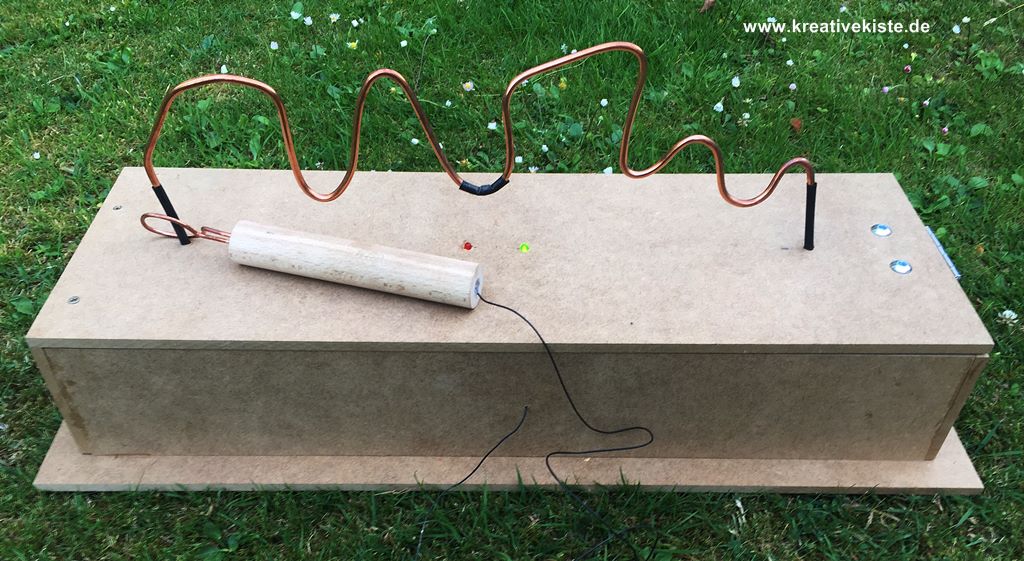
With 6mm tube: A 6mm copper tube, also from the installation area, is the ideal solution for small to medium-sized wires. Because a 6mm copper tube can be easily bent by hand without kinking. This way, cool shapes can be bent quickly and easily.
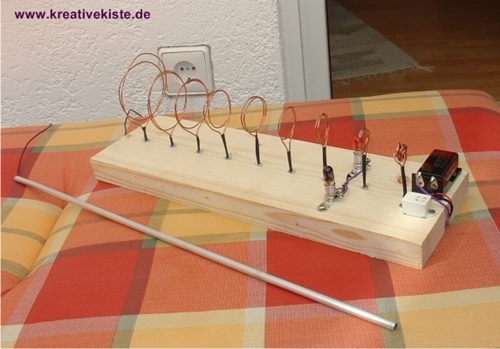
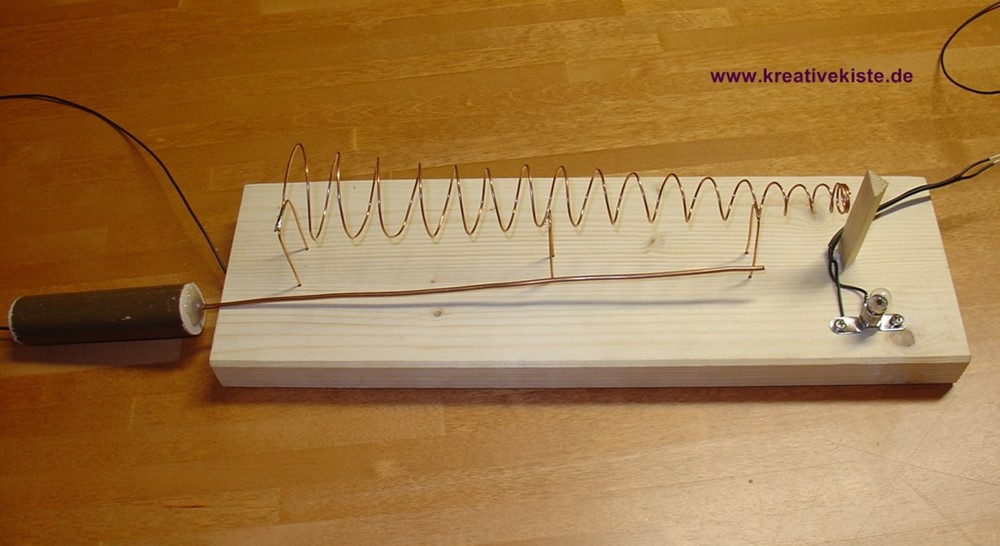
The hot noose: Instead of a wire, there are different wire loops through which a rod must be guided to the end. When one of the first eight loops is touched, the red lamp lights up. When the last loop is touched, the green lamp lights up. The game is won.
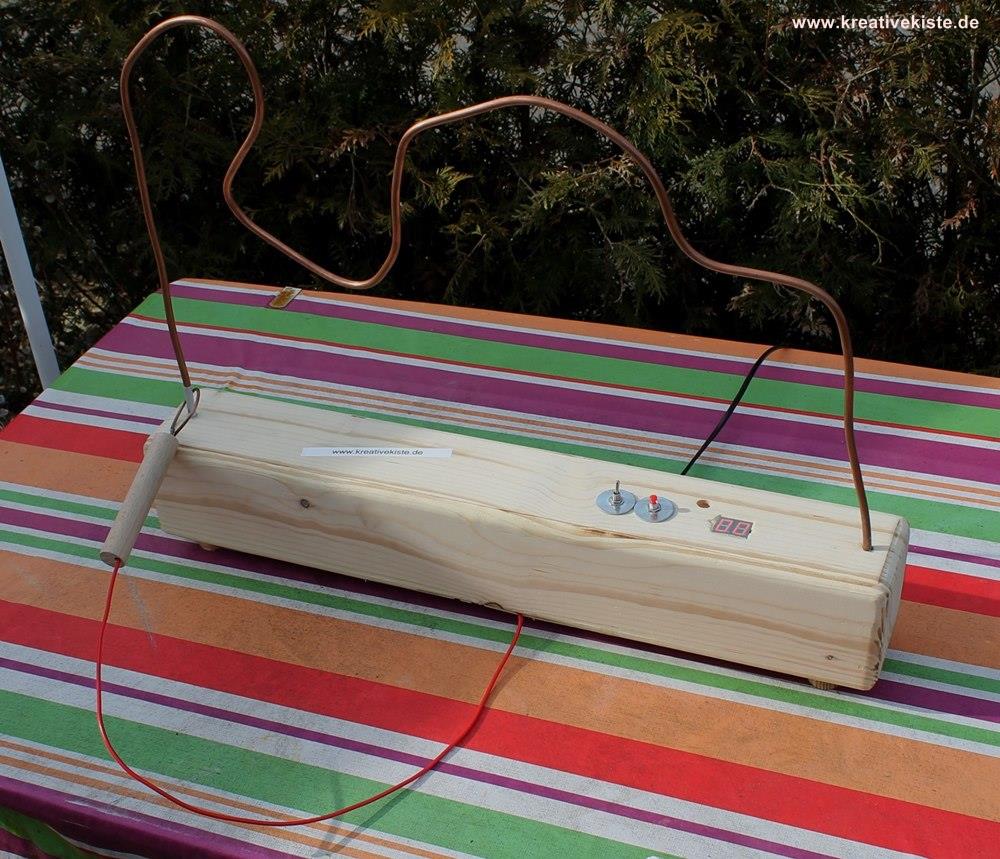
With LCD display: The display and the controls do not always have to be placed on the wooden plate. As with a laptop, it can also be installed at an angle. This increases legibility and also looks good. Here with switch, potentiometer for the penalty time and an operating LED.


With a reward: If you play the game without errors, you will receive a reward at the end. A servo motor turns and smarties fall out of the wooden wheel on the left. Here again the 6mm copper tube was used as a game.
Top class hot wire from Franz H .: This "hot wire" was built for the Jungschartag in Backnang. The wire depicts the silhouette of the city. The wrong spots are shown on the LED display. If there are up to 2 missing points, the player receives smarties as the prize. The whole thing is controlled by an esp8266. This hot wire can be rented for events. Description of the candy dispenser further down on the page.
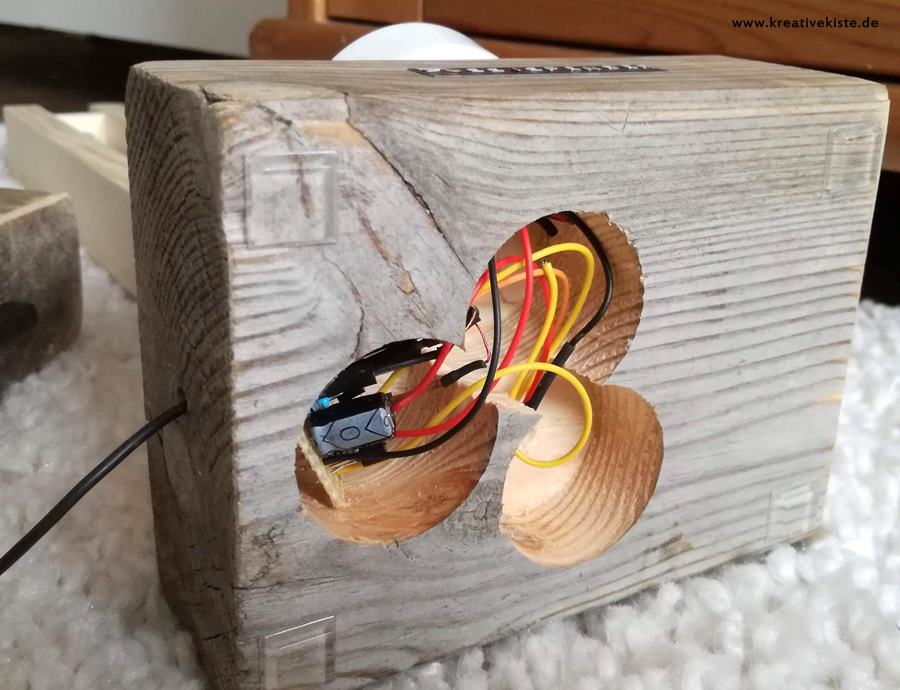
The premier class: On a whim, (that's why it doesn't look great ((is a prototype for function control))) I wanted to know if it was possible to build a hot wire with two servo motors. More specifically, two servomotors on which copper wires are attached, which move in time and degrees via a random generator, complicate the game. To all of this, a wooden board is attached to the target to which copper wire is attached and makes it almost impossible to get to the finish and the copper wire is 3D (three dimensional) bent. So not only up and down, but also backwards, so that the copper rod (left) can move between the wires. A hot wire for real professionals.
The doubly difficult one: In this game, additional tubes were attached to the actually playing tube, the contact of which is also considered an error. But that's not all: To the right of the game you have to unthread the tube and then thread it into a new tube. So the game is even more versatile. The individual pipes are simply connected on the underside with a cable.
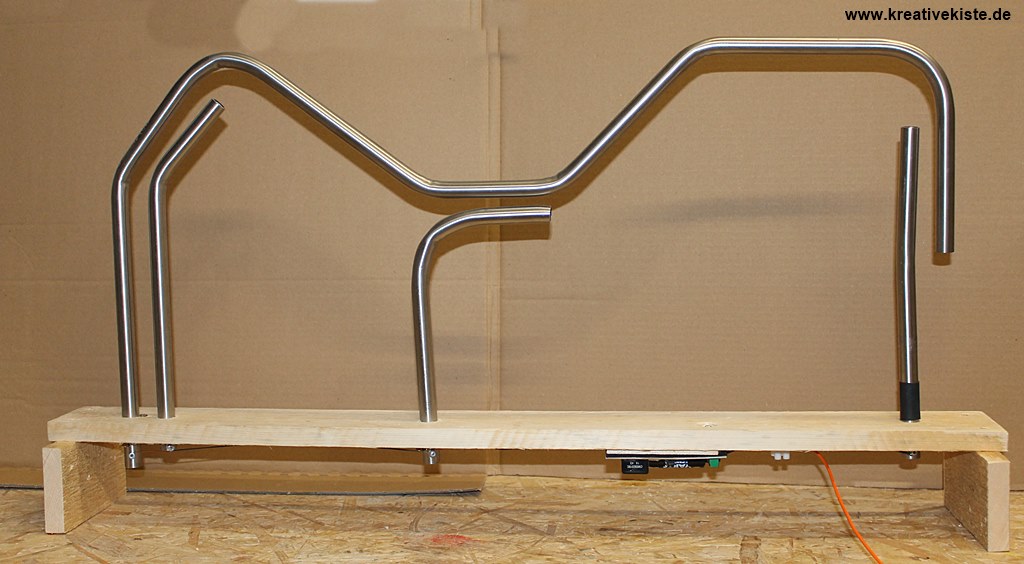
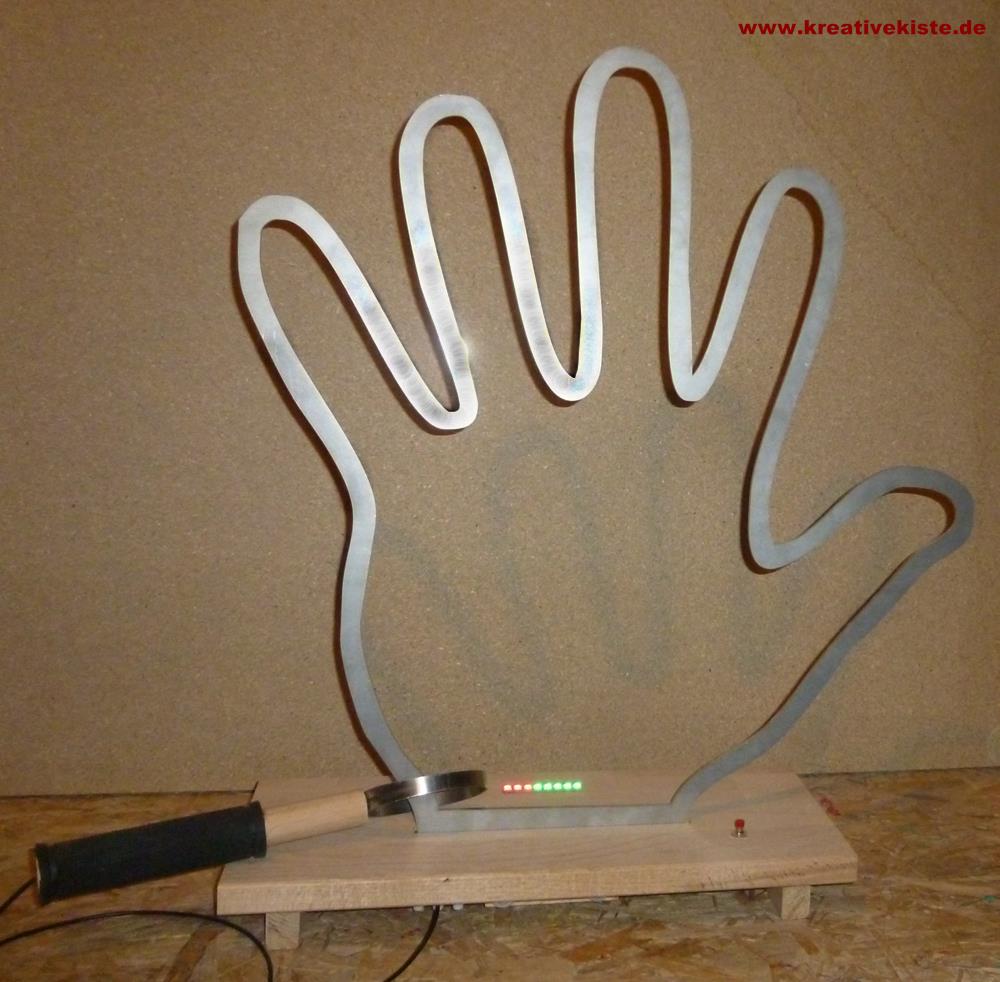
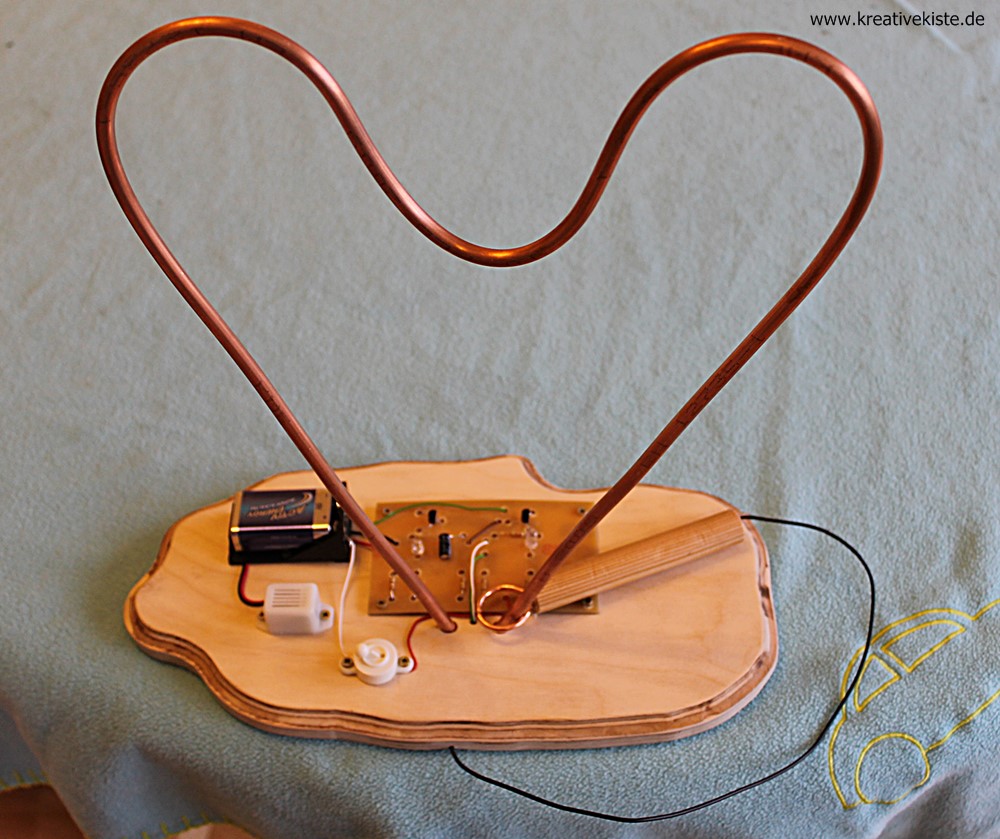
Figure made of lasered stainless steel (V2A): Not cheap, but any shape can be used as a game. Whether hand, excavator, heart or company logo, everything is possible as long as it is a closed form. Otherwise the eyelet must be open on one side and in my experience that's not really nice. This game is lasered from a 3mm stainless steel and deburred by the company. The circuit shows the errors via 8 LEDs by changing the individual neo pixels from green to red.
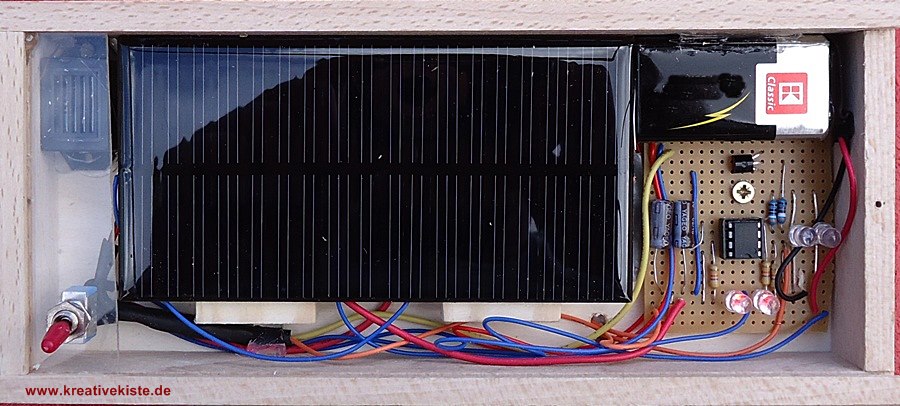
With solar energy: With a solar cell that charges a 9 volt battery when the sun is shining, you have a hot wire with a green thumb. Since the circuit is quite complex, I use a finished 5 volt USB battery charger with solar cell today. So I don't need a circuit, I have an on / off switch and my required 5 volts, immediately stabilized, are applied to the Ic.
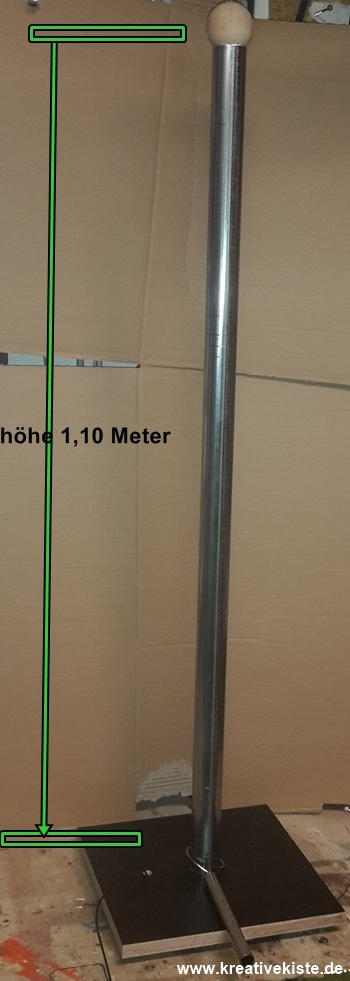
The standing hot pipe: If a very thick and standing pipe is simply used as a game, the hot wire takes up very little space and is still difficult to play. Because the eyelet has to be kept very straight for a long time. The whole built on a beautiful screen printing plate makes a great impression.
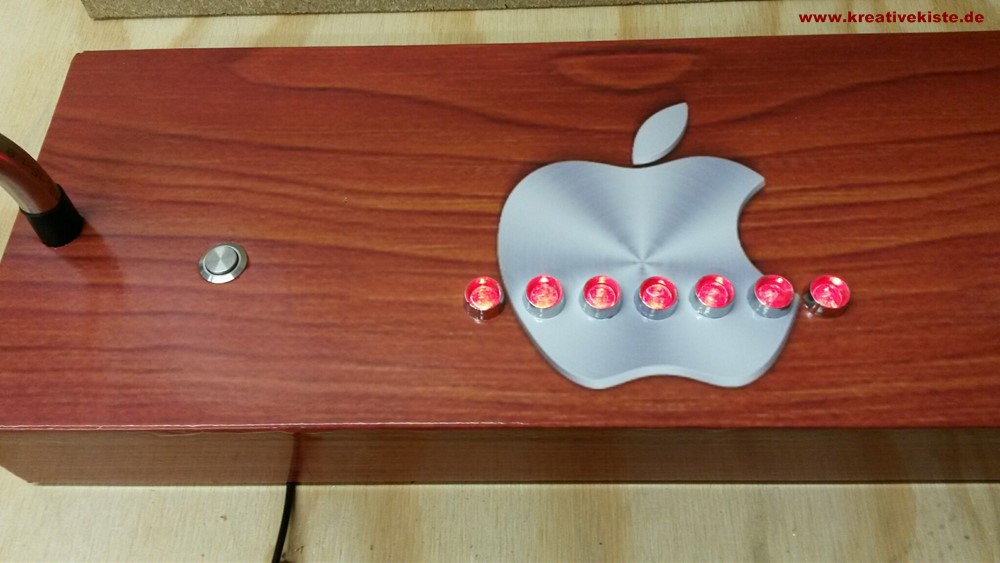
With adhesive film, loping and cold-bent stainless steel tube: If you want a particularly beautiful hot wire, you can build a small wooden box and then stick it on with foil. I had a film with the Appel logo and wood grain printed on it and then glued it onto the box. To do this, a 16mm stainless steel tube with a "loping", that is, the eyelet must be guided behind the tube once. Which also makes the game exciting.

For the LEDs, I used chrome-colored sockets and a chrome button for this game. With such sockets and buttons, every hot wire looks much better and more professional.
The gift: The hot wire was a gift. The etched circuit with soldered components is visibly mounted on a wooden plate.
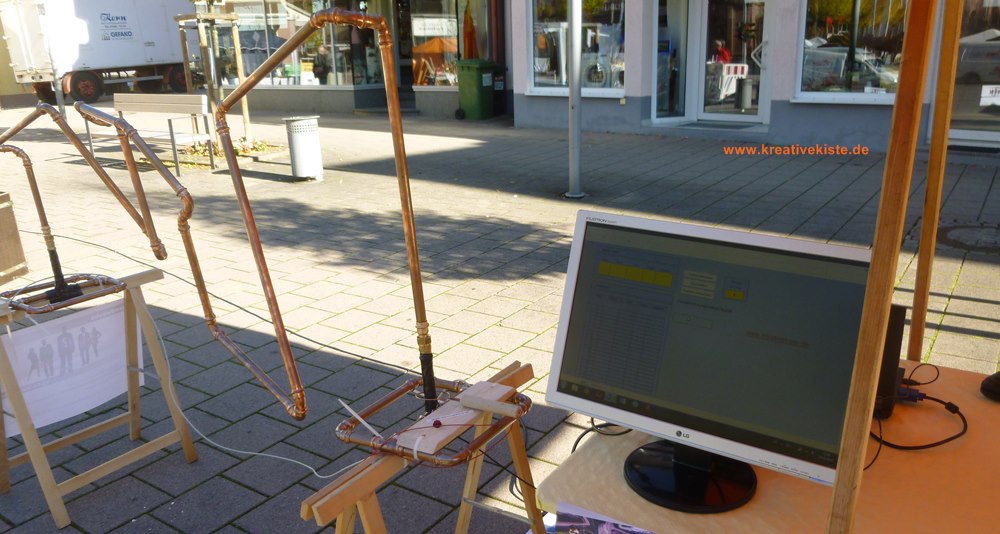
The PC connection: A xxxxl hot wire with a length of 6 meters and a PC in which you can enter your name. A leaderboard of time and mistakes will then be created automatically. The game is built from 22mm copper tubing and is somewhat "unsightly" on two trestles.
Game for hot summer days with a water shower: The nasty thing about this is that if a mistake is made, a servo motor turns, which in turn presses on a pump spray bottle and from it comes a small, common water jet for 3/4 seconds. This game does not require LEDs or a buzzer, whoever is wet has touched the wire. END of the announcement. Realizing the spraying with a servo and a spray bottle is not quite DMAX "the model builder" compliant but it had to be quick, works and costs very little. If you would like to have it nicer or better integrated into the game, you could use a 12 volt windscreen washer system from a car.

Hot wire for two people: the game starts with a button in the middle. The game is now ready and must be started with one of the eyelets to the right or left of the wire. So that there is no advantage for a player, a triple piping sounds (beep, beep, piiiiiiep), then it starts. Now every player can turn his display to green. In the event of an error, the display of the respective page then changes to red. The game must now go back to the beginning and switch its display to green again. This continues until a player who has mastered the game without errors. To do this, he touches the eye on the other side. Then the display goes blue and shows the winner. It is no longer exciting to write down without annoying times or mistakes.

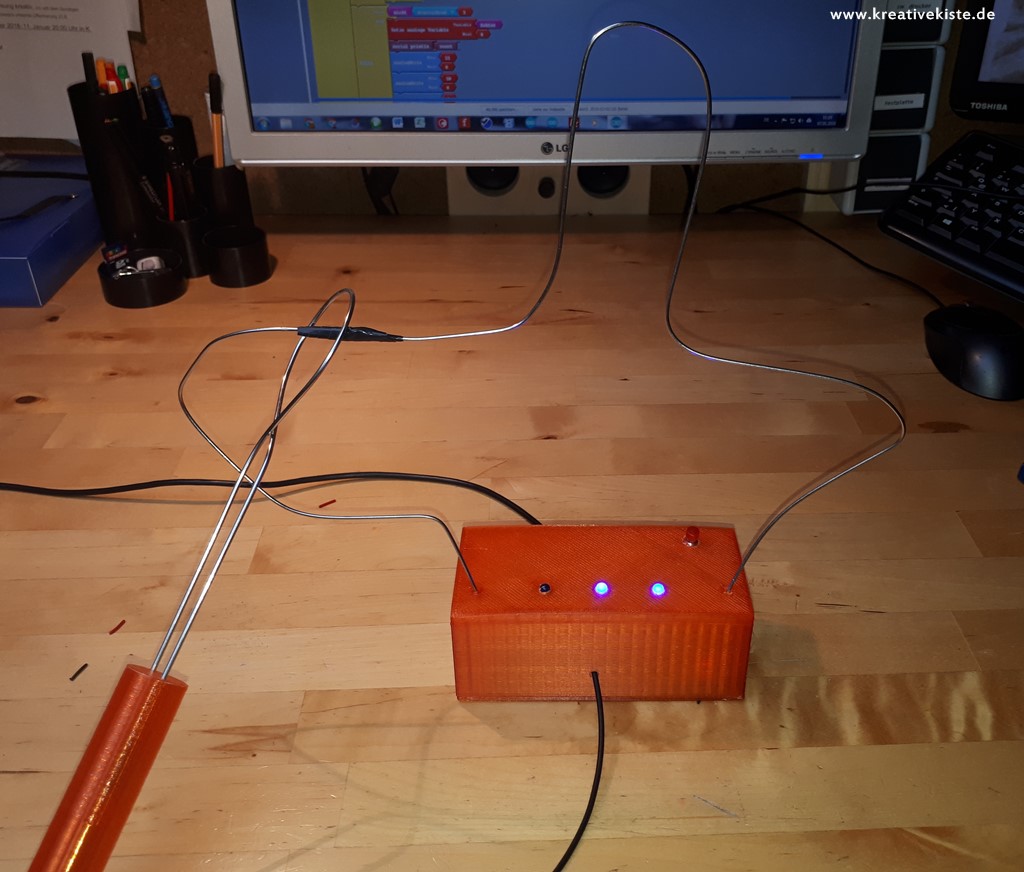
Hot wire from the 3D printer: Why not print out the housing and the handle completely and just plug all the components together. I did that here. This hot wire was created from the three parts, handle, base and housing. Add a stainless steel wire, three LEDs and an Arduino, all plugged in with cables (not soldered) and you're done -> great :-). Click here for the building instructions.
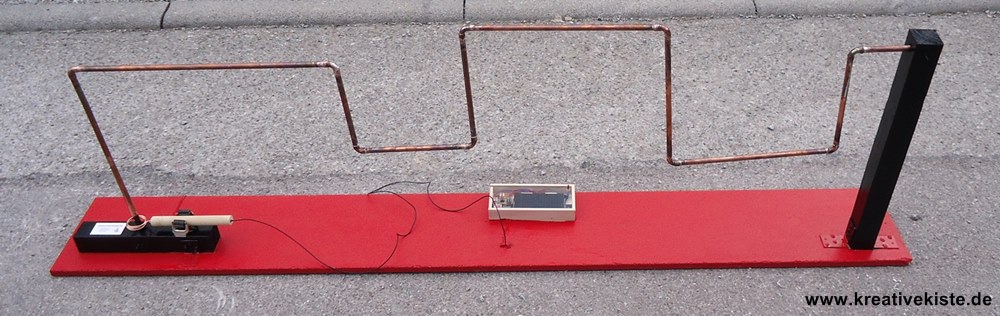
With colored base plate: Red base plate and the attachment for the tube in black. At the same time, the tube can be attached well to the square timbers. Simply drill a hole and fix the pipe with an M4 screw. The handle is also well attached with a clip when not playing. The game is built from 12mm copper tubing that has been soft-soldered.
Play on a box. The hot wire can also be built on a small wooden box. So the electronics are well protected. If you still build the game so that the wire or tube can be removed, you can put it in the bottom of the box and everything is tidy.
Pipe, wire, rope, diameter and material for a hot wire
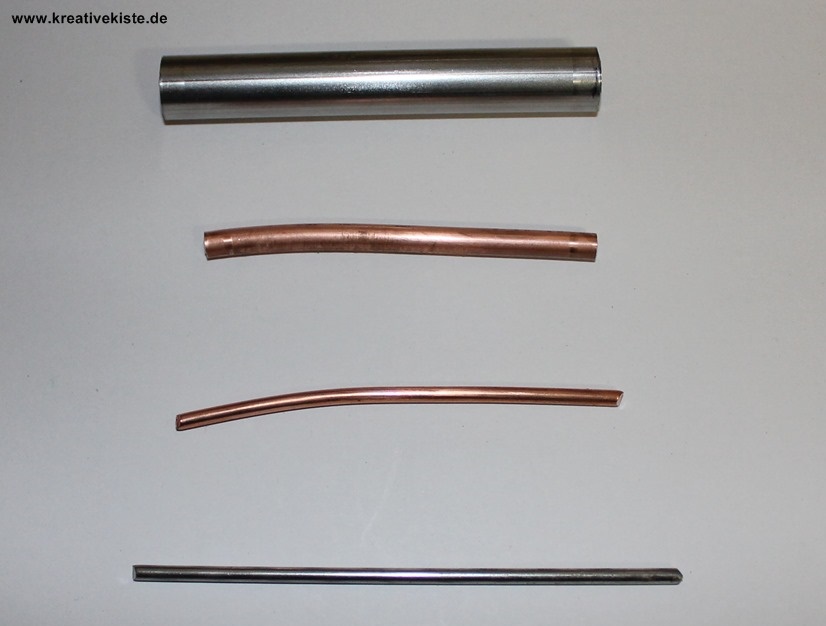
Again and again I am asked which diameter should be used for which length. So here is a rough recommendation. The information also relates to the playable length and not to the length of the board on which the game is built. In general, the game can be built from copper, stainless steel, aluminum or other metals. If no IC is used, however, very good conductivity such as copper should be used. From top to bottom:
Pipes larger than 10mm mainly because of the beautiful appearance of stainless steel pipes. Have the advantage that they are very stable and can therefore also be used in very large games. The disadvantage is that they have to be bent, pressed, soldered or welded with bending machines. What a certain equipment and know-how requires.
Pipes smaller than 10mm, especially 6mm copper pipes. Have the advantage that they can be bent by hand without kinking. Even small radii are possible if the pipe is bent over a log. The disadvantage is that the copper does not look so beautiful for a short time and has to be cleaned with a pipe flow.
Wires, in all designs. Have the advantage that they are cheap and can be bought almost anywhere and can be processed with a minimum of tools and craftsmanship. The wires from electrical lines are particularly useful here. The disadvantage is that large wires cannot be built.
For bent wires and tubes
- Under 50cm a thin wire with a diameter of approx. 1-2mm should be used.
- Under 100cm a wire with a diameter of approx. 2-3 mm should be used.
- A wire with a diameter of 4 mm or a tube with a diameter of 6-10mm should be used over a meter.
- A pipe with a diameter of 16-22mm should be used over two meters.
- A tube with 22-28mm should be used over three meters.
- Over four meters, a cold bend or welded pipe with 28-35mm should be used.
For straight wires and pipes, vertically and horizontally
- A rope with a diameter of 1mm or a tube with a diameter of 10-14mm should be used.
- A rope with a diameter of 2mm or a pipe with a diameter of 14-18mm should be used.
- Over three meters, a rope with 2-3mm or a tube with 22mm diameter should be used.
- A rope with a diameter of 3mm or a tube with a diameter of 22mm should be used over four meters.
- Over 5 meters, a rope with 3-4mm or a tube with 28mm diameter should be used.
Build play stick with eyelet
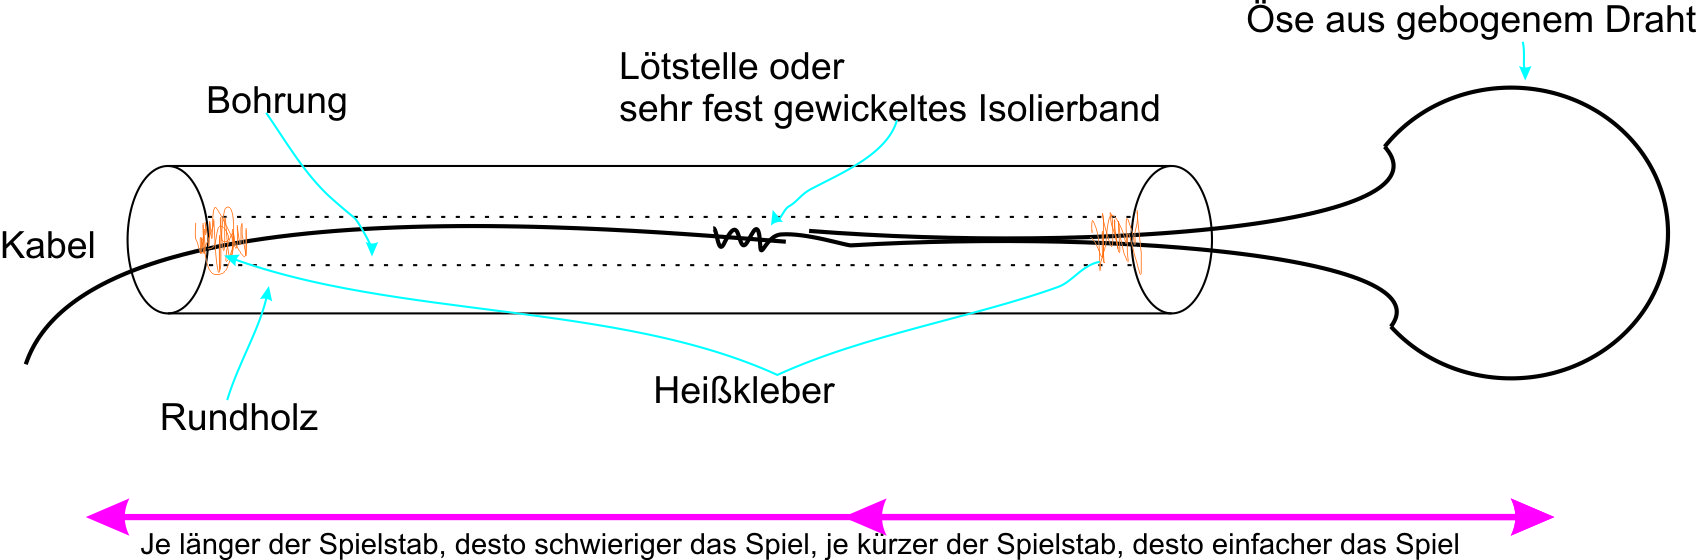
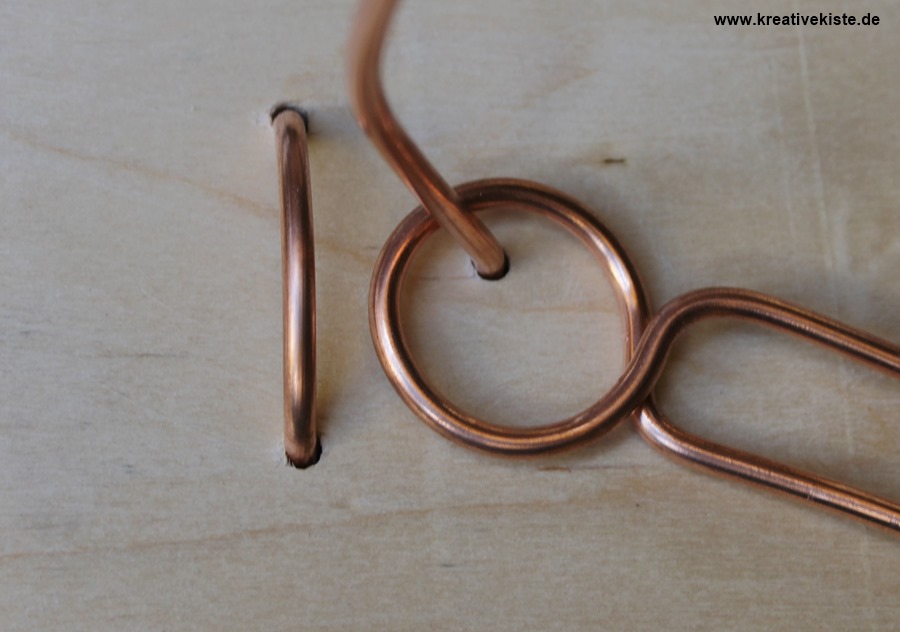
The play stick with the eyelet is held and guided in the hand during the game. In most cases, the part that is held by hand is made of wood and the eyelet is made of copper or stainless steel wire, but rings that are sawn off larger tubes can also be used. That of course looks particularly nice (see below). The cable is then connected to the circuit and should only be so long that it can still be played properly. In addition, the starting part of the game should be insulated with tape or better with shrink tubing. This prevents wire and barren from touching when not playing.
To build the play stick, a hole is drilled completely through the wood in a round wood with a length of approx. 12 cm and a diameter of 2.5 to 3 cm. The eyelet to which a cable has been soldered now comes into the hole. If you do not want to solder, you can also strip the cable and firmly mount it with insulating tape on the eyelet.
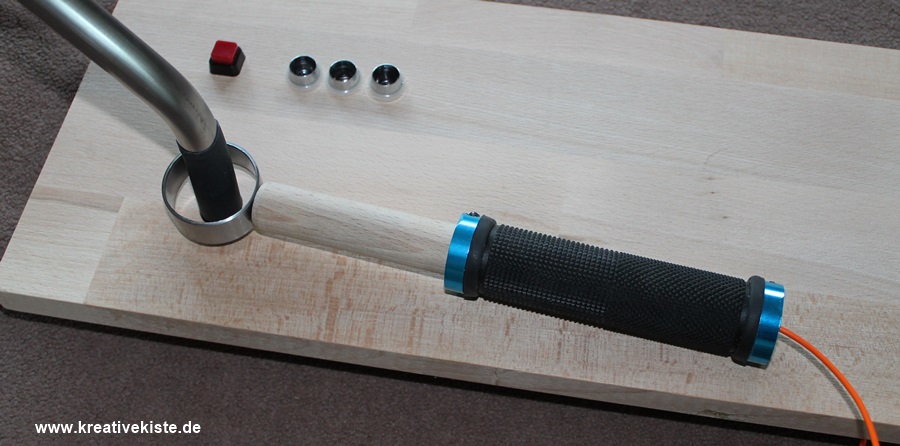
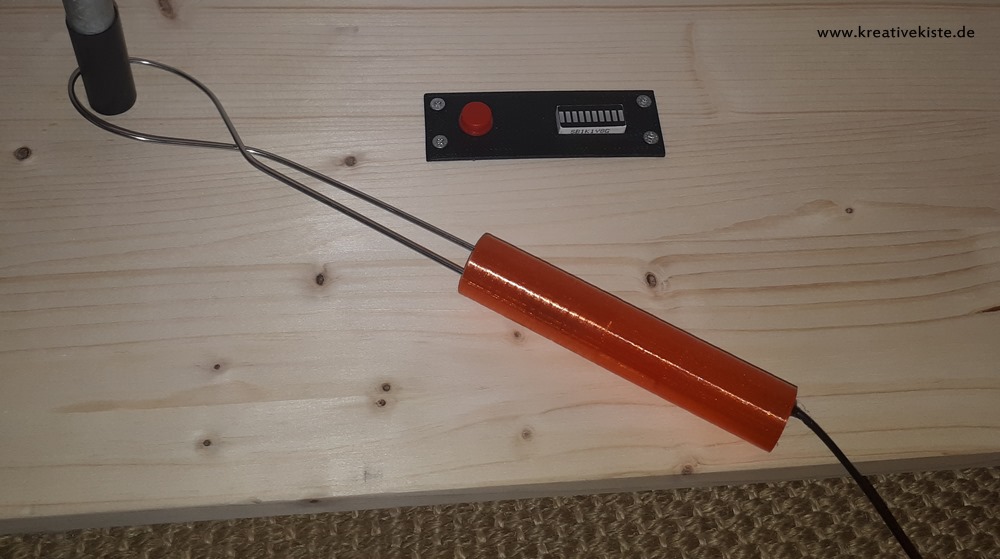
If you want to make the eyelet particularly beautiful, you can mount the handle of a bicycle on the wood or glue shrink tubing over the handle. The handles of files, hammers or other tools have turned out to be beautiful.
If this is too complicated for you, you can also bend a stainless steel wire and use it as an eyelet.
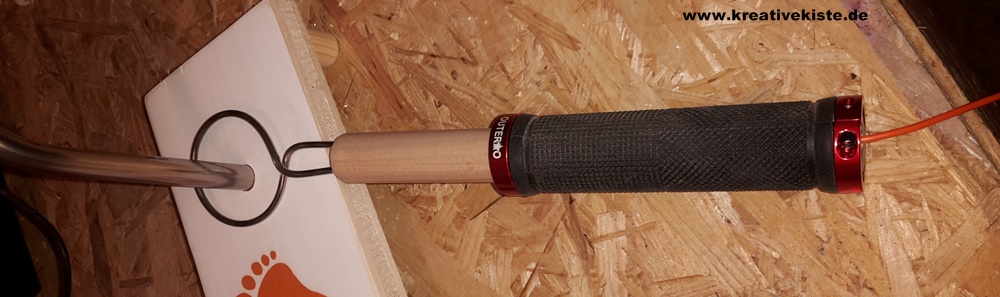
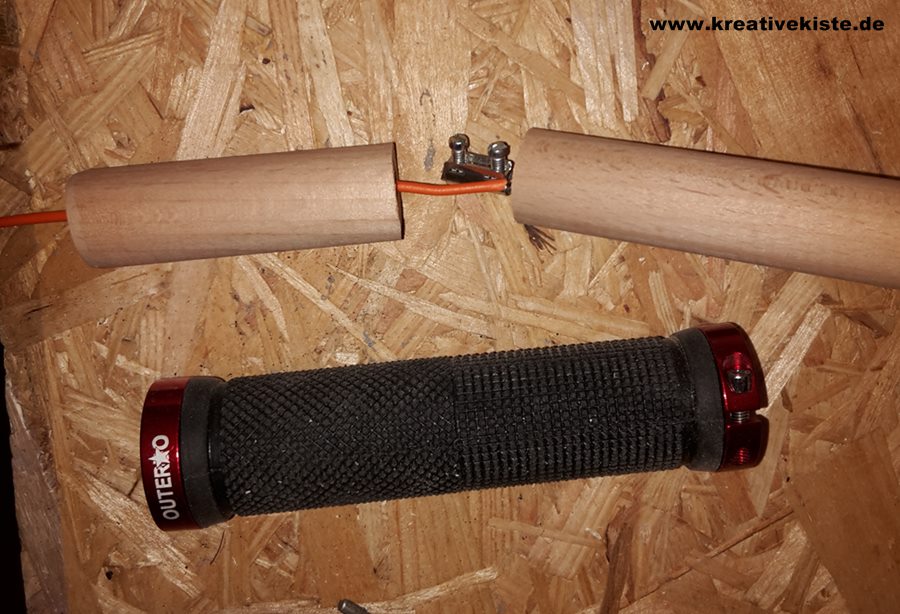
The bicycle handle has another advantage. The connection between the eyelet and the cable does not have to be put into the handle with difficulty, but can be jammed in the handle. To do this, saw through the log and connect the cable and eyelet with a luster terminal and then put the handle over it.
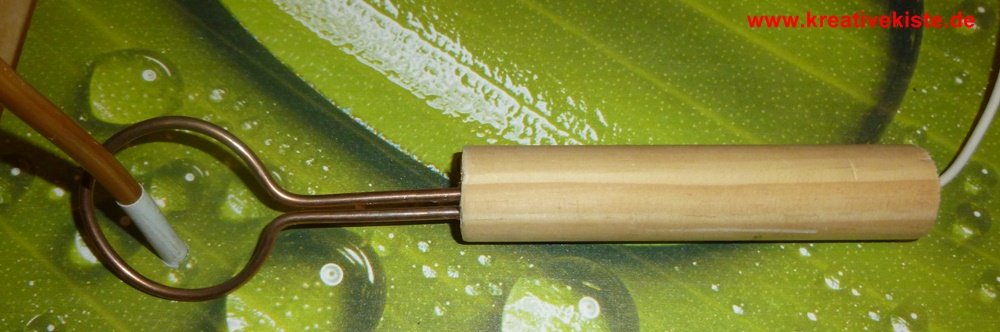
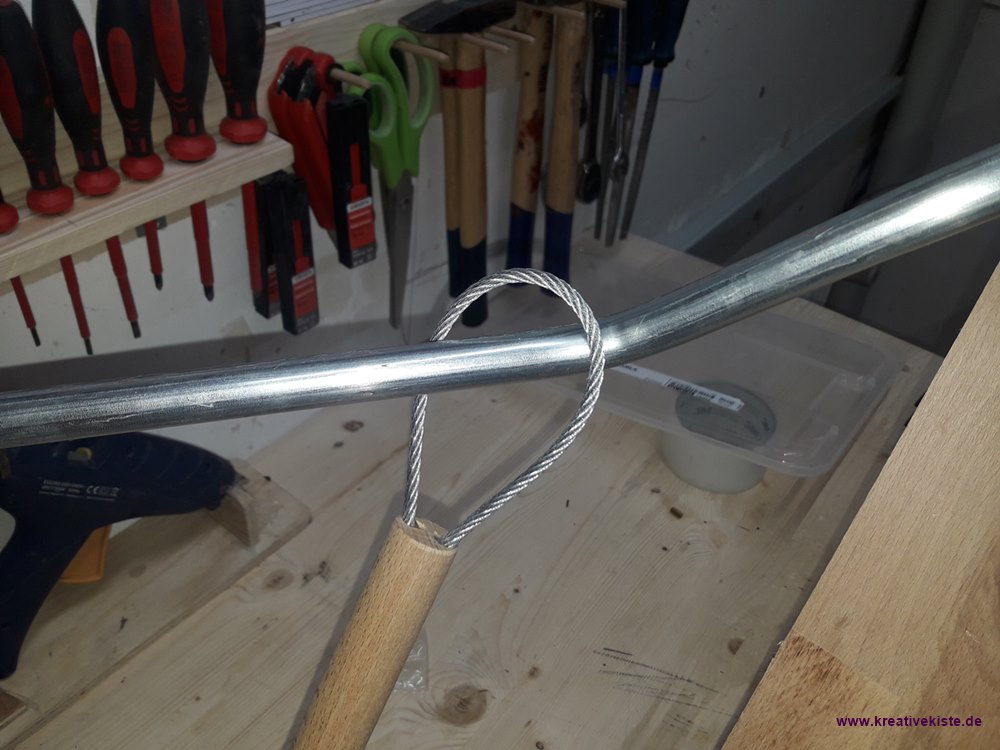
a wire rope as an eyelet is also nice. Care must be taken to ensure that the shape does not become too much like a pear. Otherwise great to build and play.
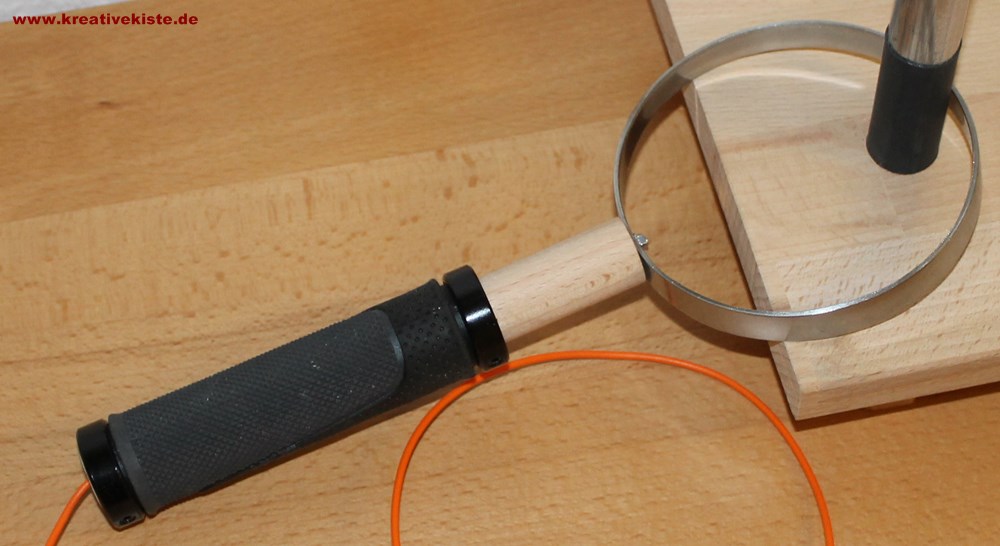
If you want to make the game particularly difficult, you can attach the eyelet to a broomstick or use a sawn-off tube instead of wire as in the picture above. Above all, this makes the corners more difficult because the area for playing becomes smaller.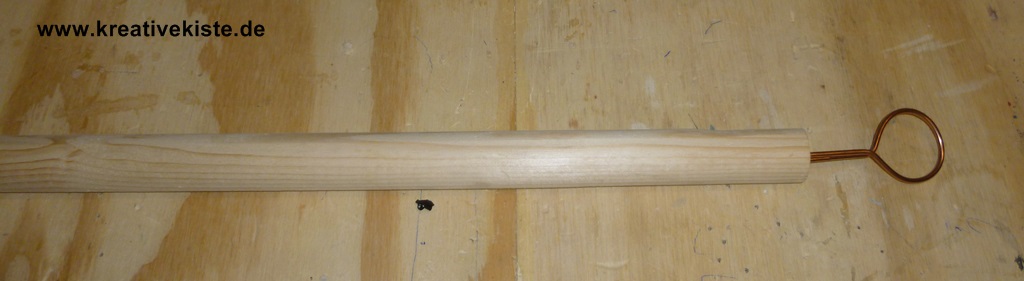
If you want to make it particularly easy, you simply build the eyelet quite large. Especially with smaller children, a large eyelet guarantees more fun. Because they too can master the game. So even the little ones have a sense of achievement while playing.
It can also be a simple bike handle without screws, which makes it a little easier to build and cheaper to buy. If the eyelet is not built closed, the eyelet can also be removed from the game and, for example, replaced by a larger one for smaller children. So different levels of difficulty can be played or wires can be built that are fastened or consist of letters that have to be changed. Of course, the risk that someone tries to cheat is greater.

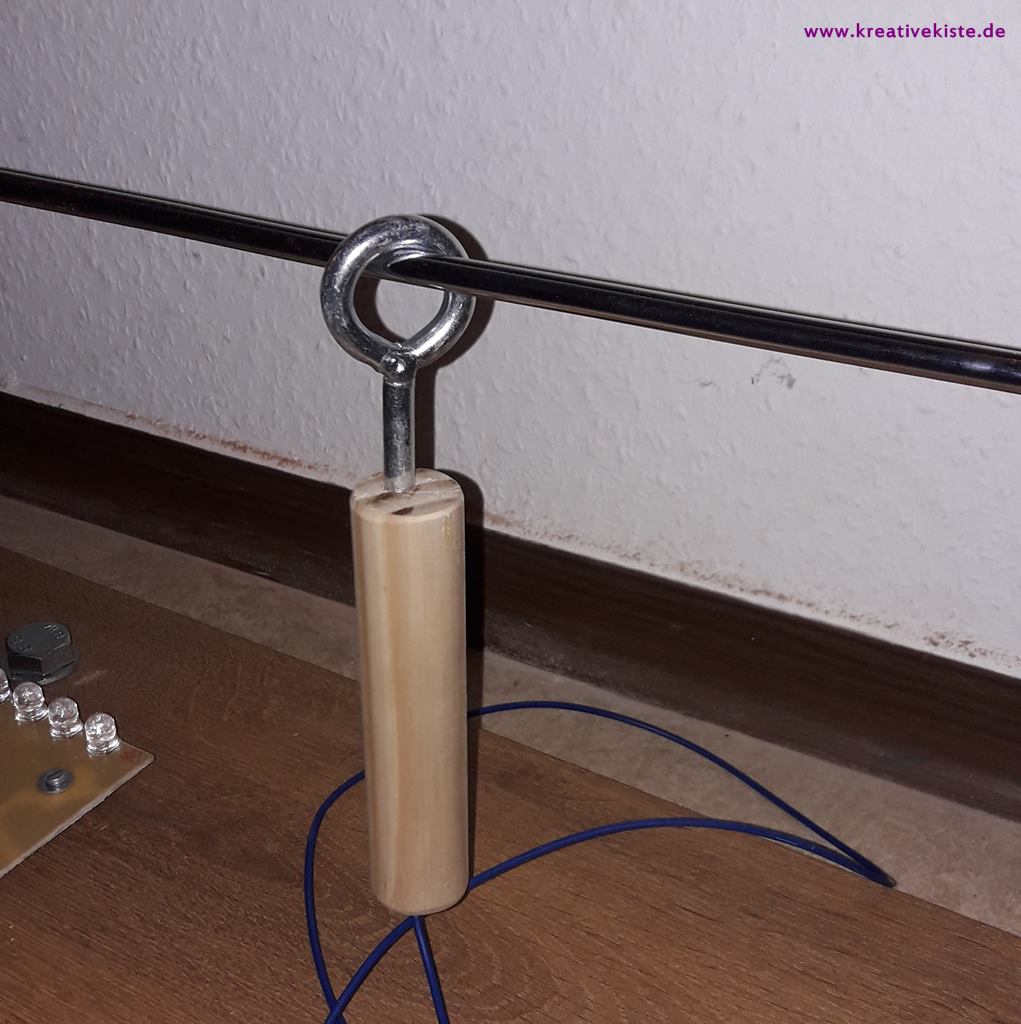
If you want to build a whole simple and beautiful eyelet, but don't want to bend wire, you can buy an eyelet at the hardware store. This cost only 4 euros and was found in the screw department. Drill a hole for the cable all the way through the wood. Strip the cable approx. 7-8 cm and then screw the copper wires with the eyelet into the wood. The contact between the eyelet and the copper cable is sufficient to count errors.
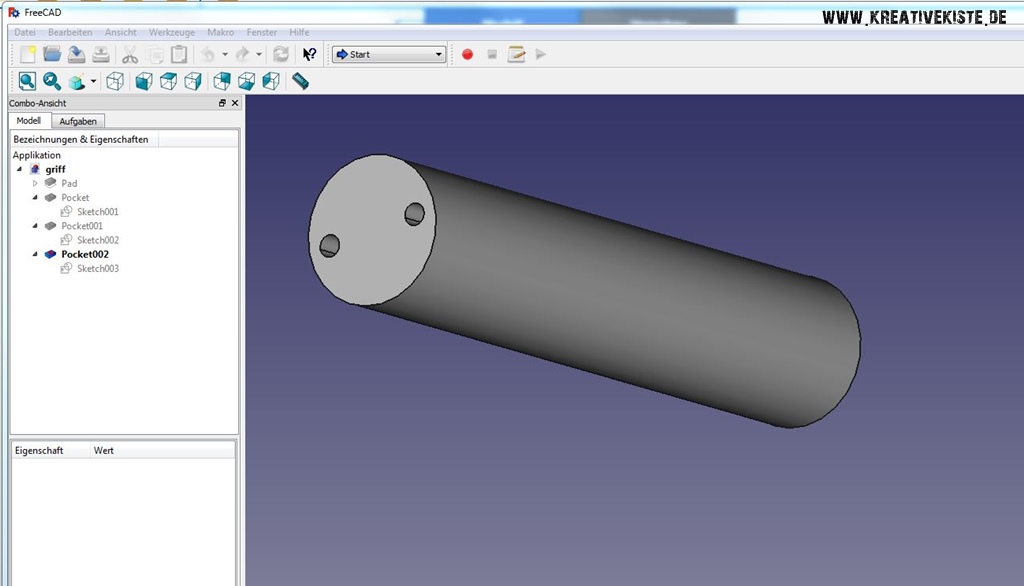
A handle from the 3D printer looks particularly beautiful. But I think the handle doesn't feel as great as the bike handles. However, it is much easier to print out a handle than to build a wooden handle. First of all, it is not easy to get the holes where the eyelet comes out of the wood.
Start and stop of time measurement with the play eyelet
Especially when measuring the time it takes a player to master the game, there can be controversy. Because the button can be pressed sooner or later. Since the inputs of the Attiny or the Arduino can both be controlled via the same potential, the play loop can be used for the errors and the start. Then attach the error pin to the game and attach the start pin to a piece of wire or similar next to the game. So the game starts when the eyelet touches the piece of wire and JIPI, no more arguments.
Hot wire circuits
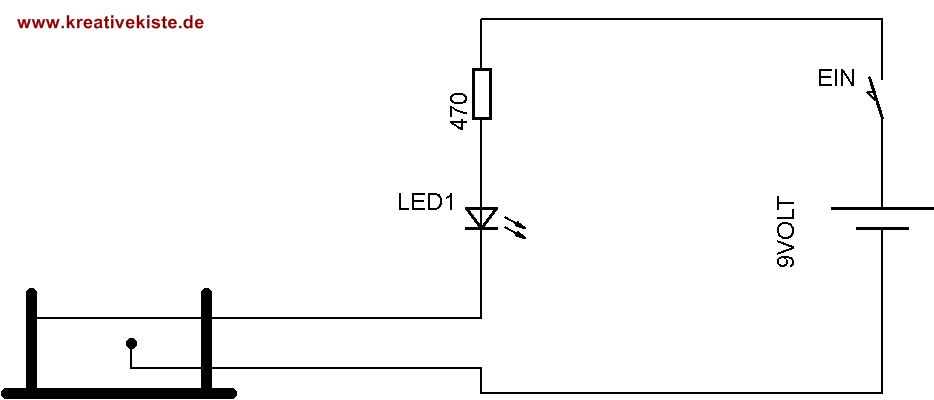
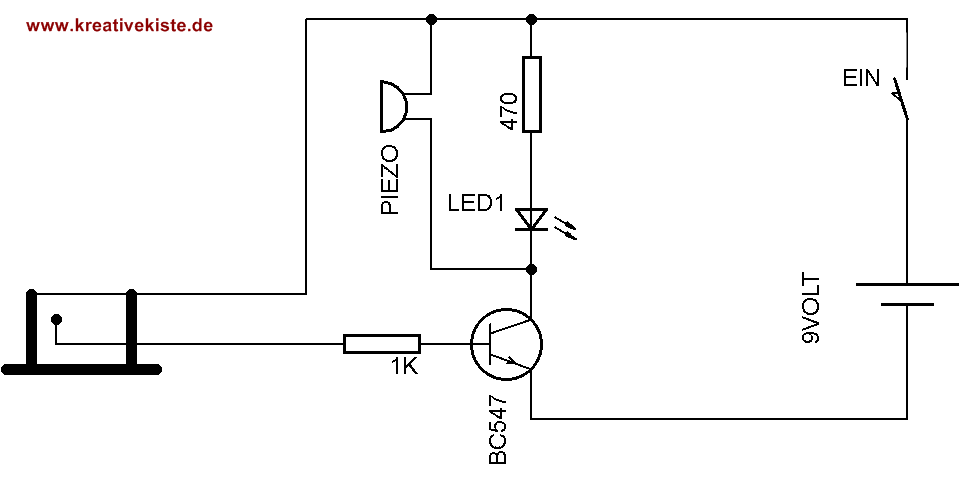
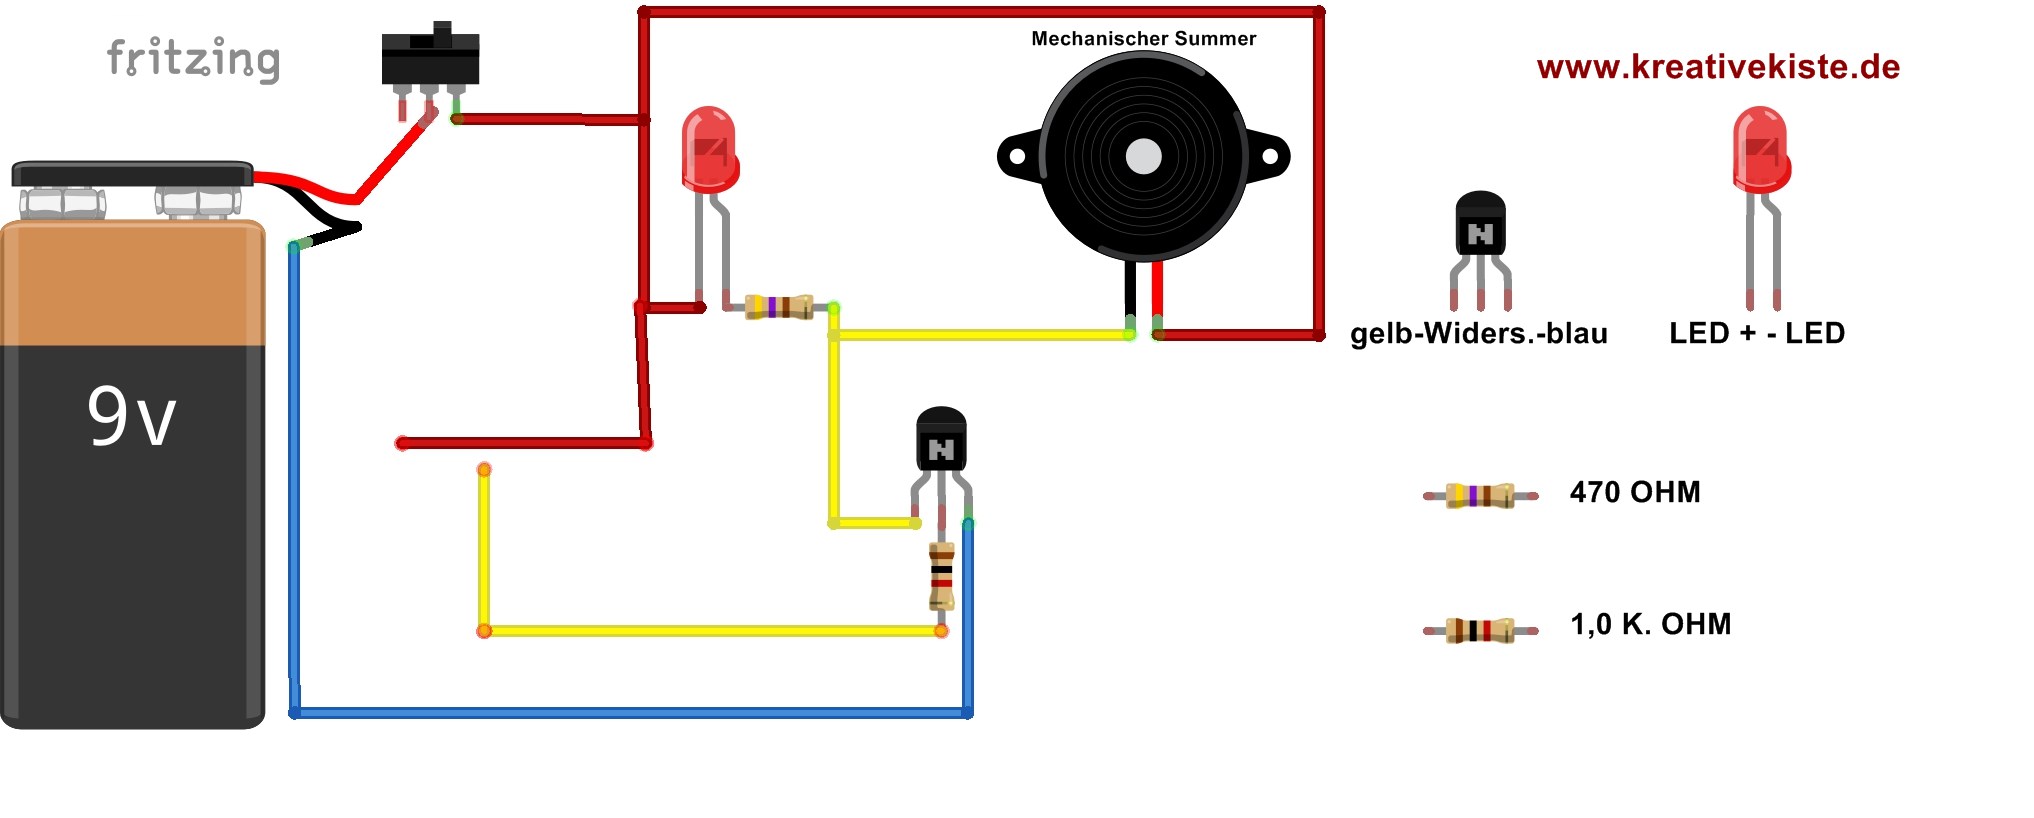
Circuit with LED and buzzer:
This is the simplest variant of a hot wire. There is only one switch between the battery to switch the game on and off. From the battery it goes to the switch, then to a series resistor with 470 ohms so that the LED is not destroyed and then to the wire. If the circuit is closed by an error, the LED lights up. When the contact ends, the LED stops lighting.

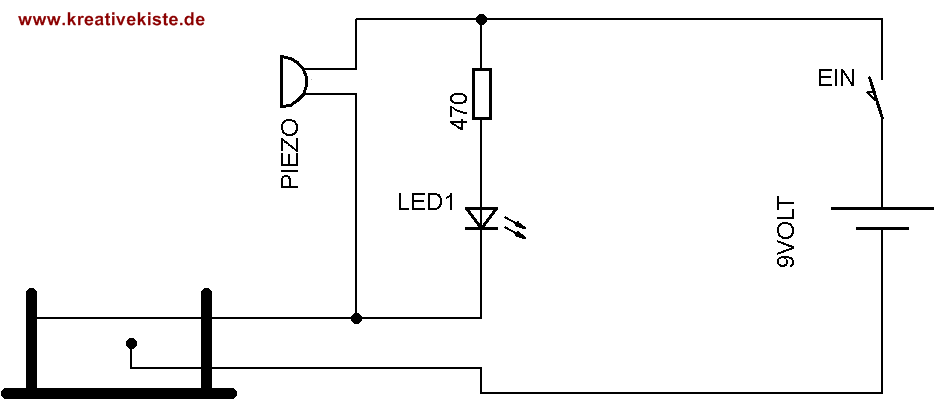
The disadvantage, of course, is that a mistake is very difficult to "make out". So a buzzer has to be added. This is installed parallel to the LED. Now the error is displayed optically and acoustically.
Circuit with a transistor as an amplifier:
A transistor can boost a small voltage applied to the base. So we apply the voltage to the base of the transistor that comes from the contact between the wire and the loop. This low voltage is amplified by the transistor and even small and short touches are displayed.
Here the circuit fully assembled in a luster terminal. The circuit was a primary school project in a fourth grade. It was built up bit by bit by the students under my direction. A great handicraft for small electric explorers.

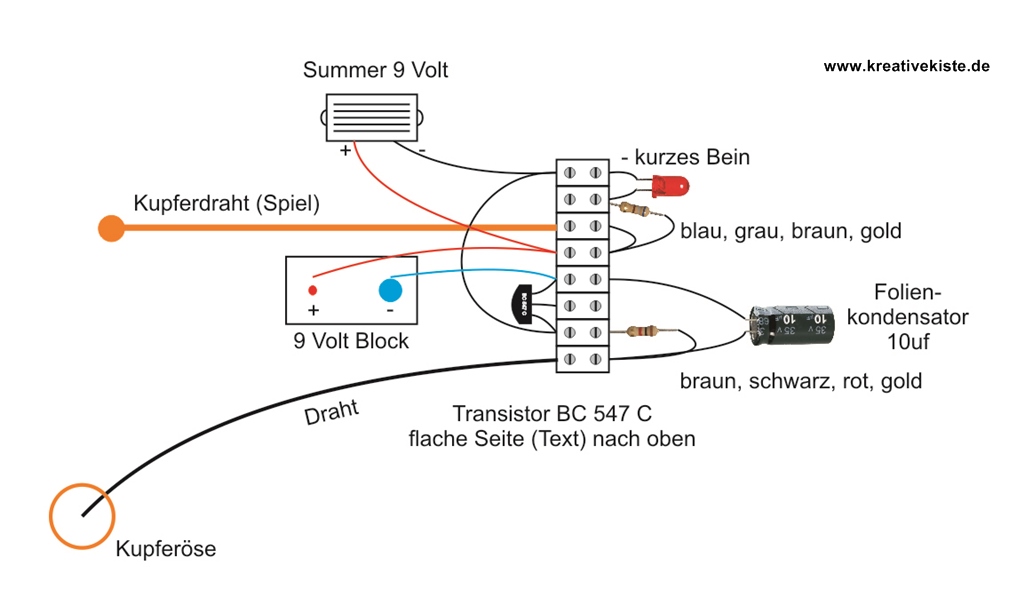
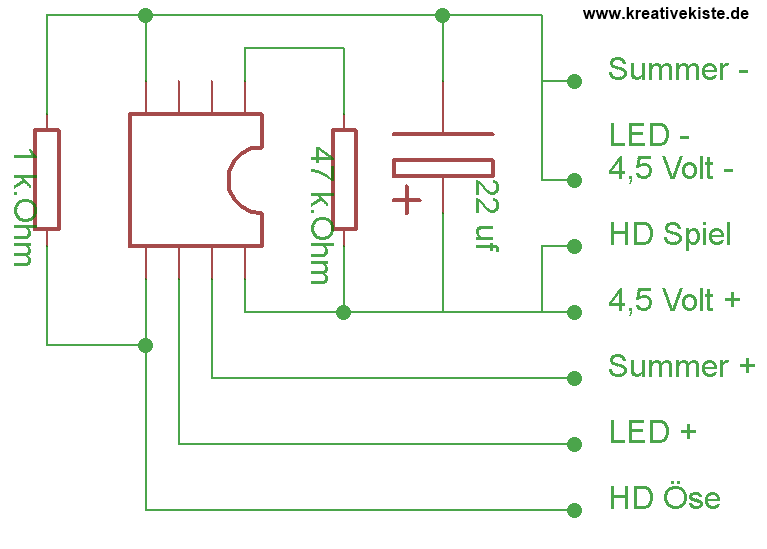
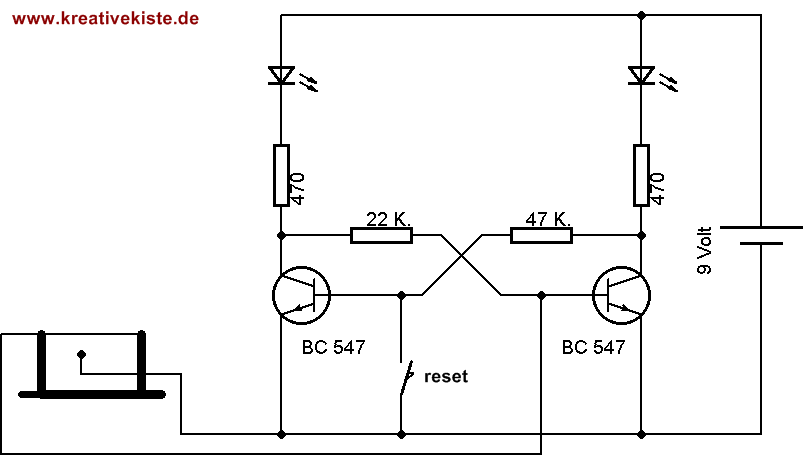
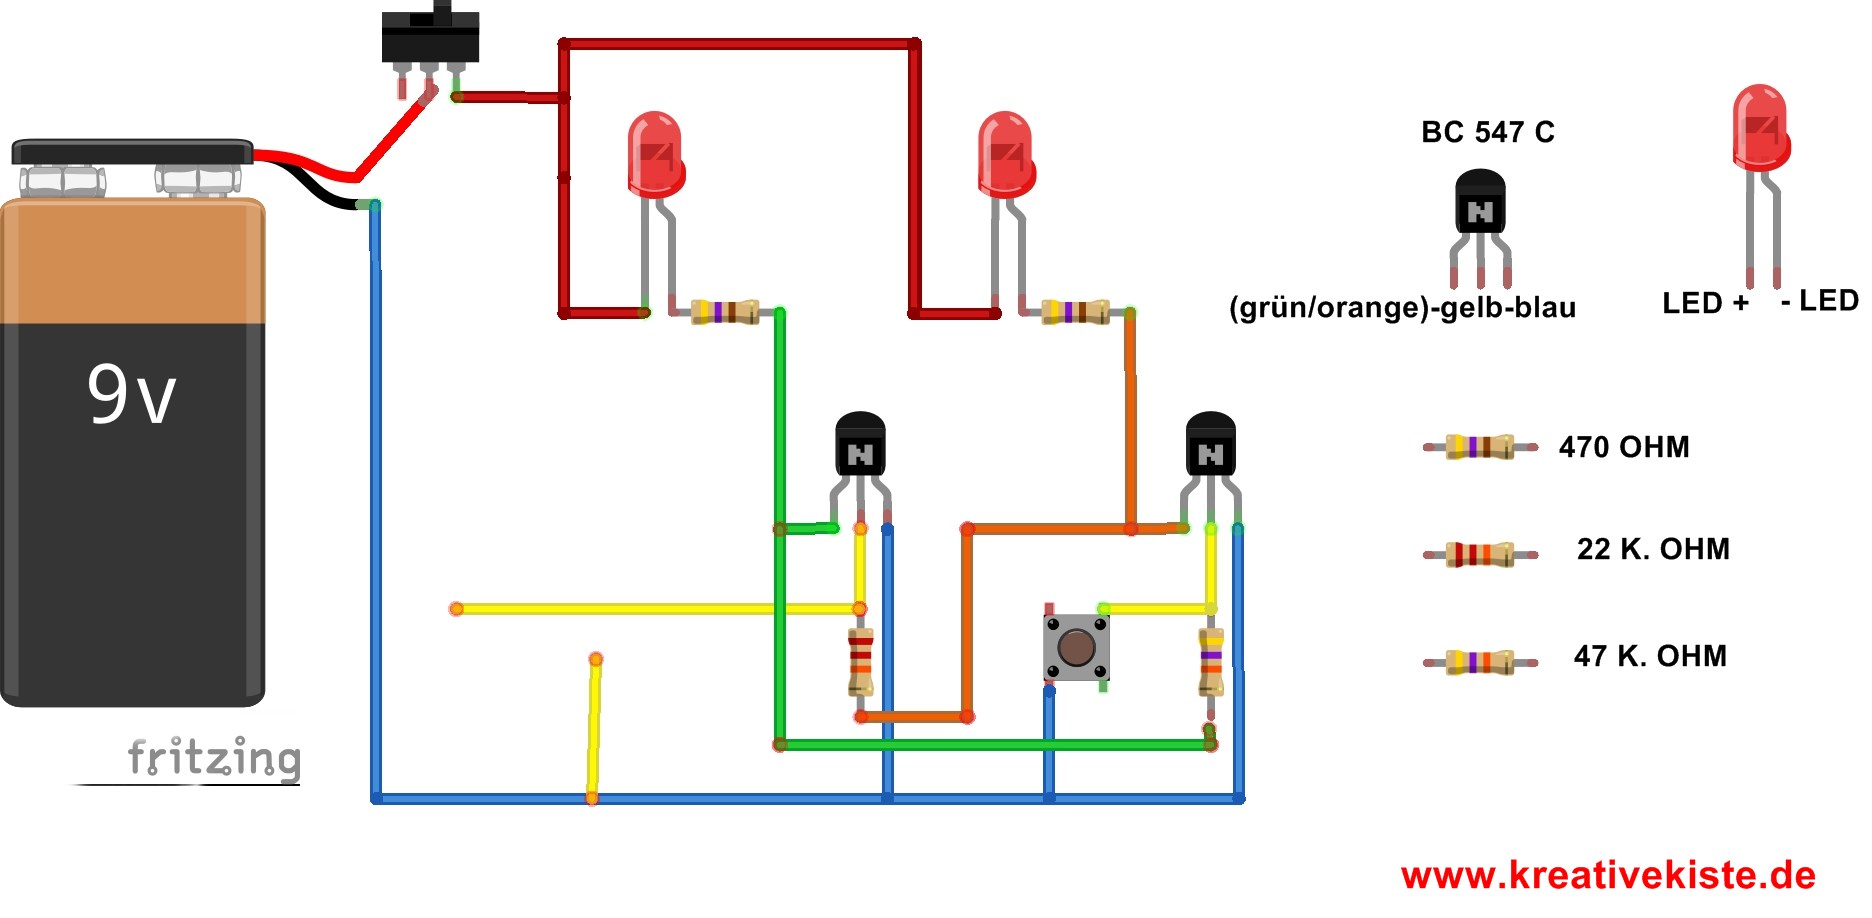
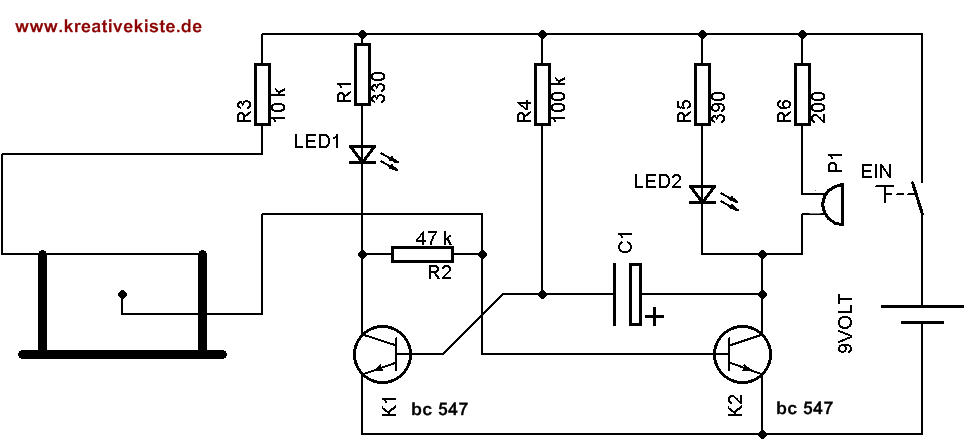
Circuit with a capacitor as a memory:
So that an error is "even" more clearly recognizable, the buzzer and the LED must indicate the error longer than it was actually made. A capacitor has the great feature that it can inflate in a fraction of a second. After a touch, the capacitor discharges via the transistor BC 547. Since the transistor has a small voltage to switch, the buzzer can be heard after a touch (an error) and the LED lights up for a short time.
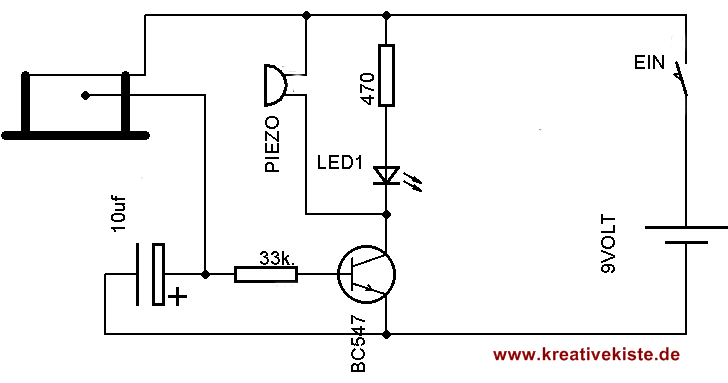
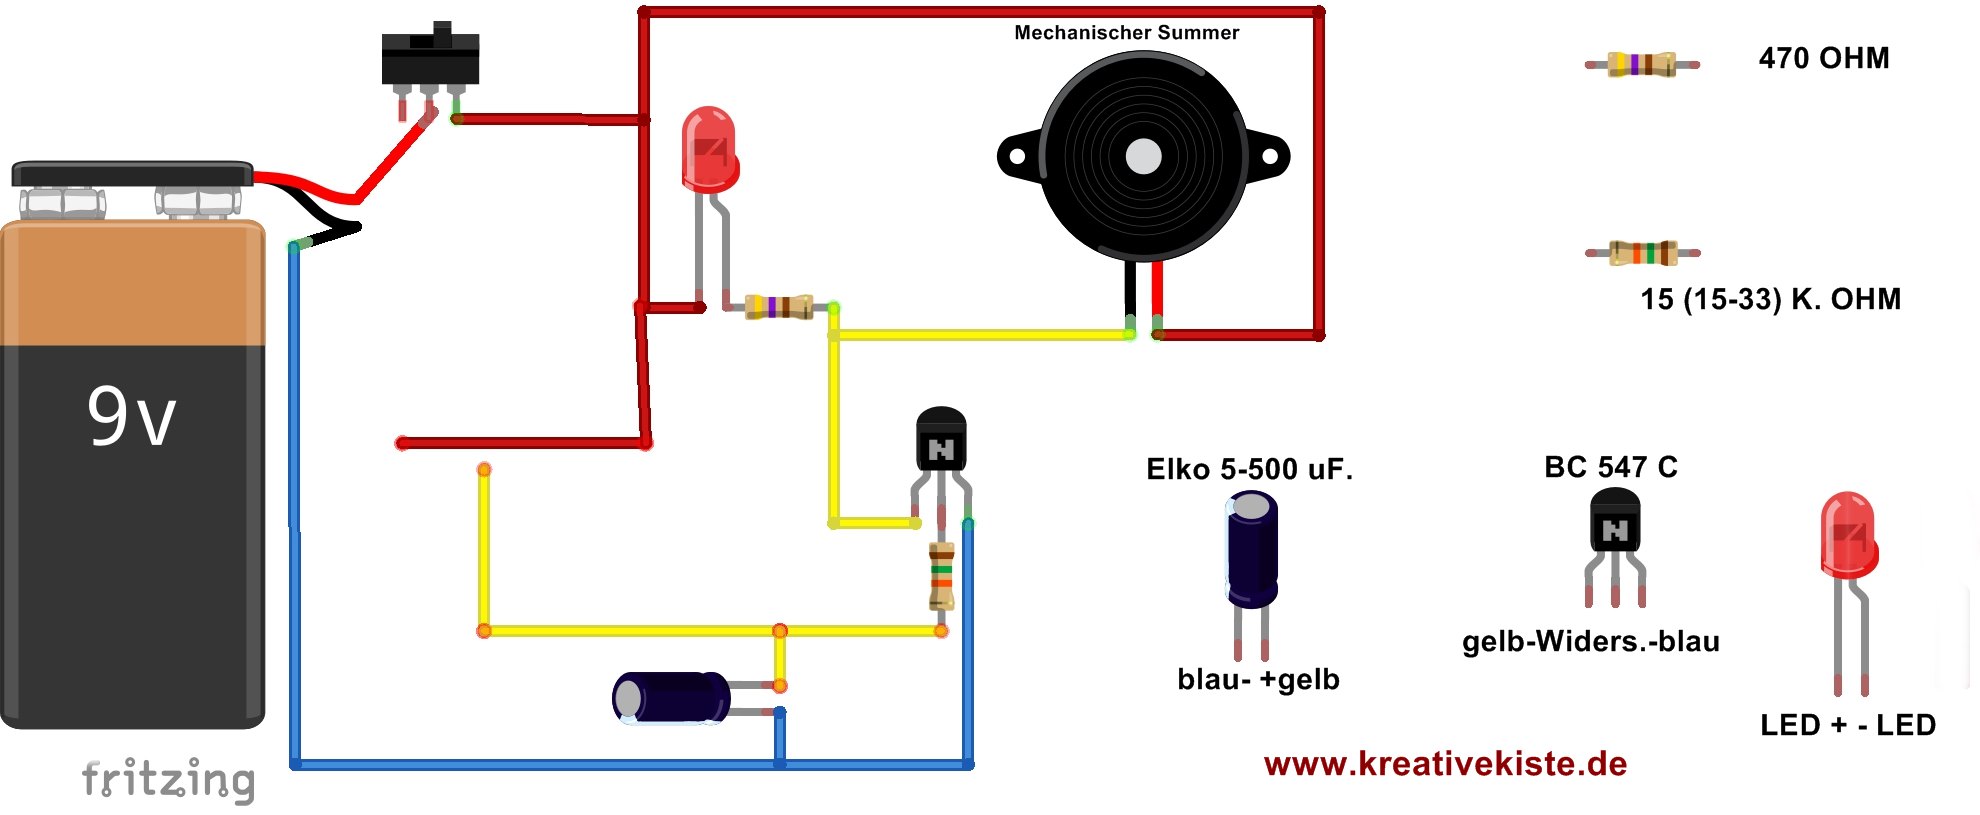
To change the time in which the error is displayed, you can simply change the capacitor. Shorter time = smaller capacitor, longer time = larger capacitor. Here the circuit with the capacitor is built in a luster terminal or on a strip grid board.
Here is the circuit in a luster terminal:
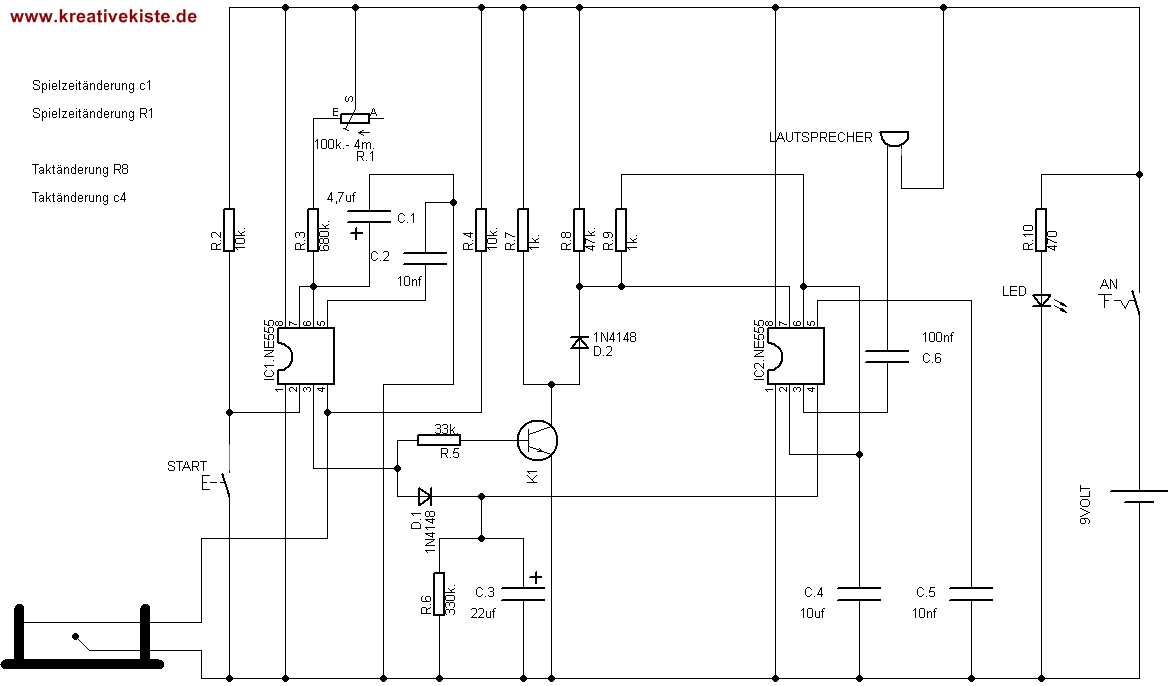
Switching with an NE 555:
If an error is made, the Ne 555 "remembers" it. In the event of an error, it switches output (3) on for a specified time (here 2/3 seconds) and then immediately off again. This eliminates the annoying slow "humming". In addition, I have built a switch in front of the buzzer, so the buzzer can be switched off. This can be a blessing on a birthday or for annoyed parents.
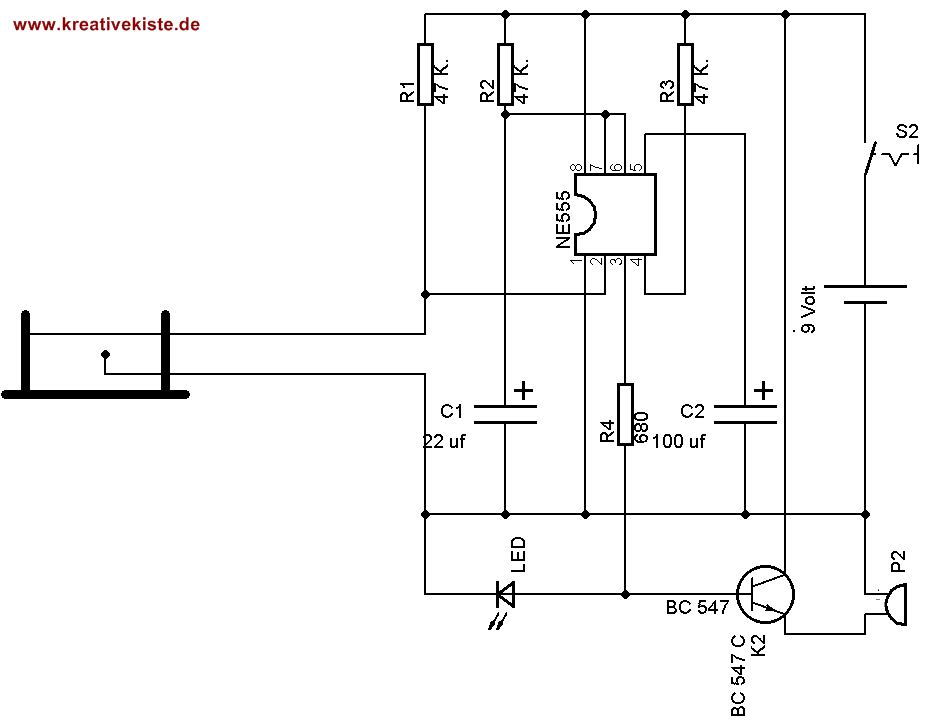
The circuit also prevents double error counting. If the wire is touched twice in quick succession, the circuit is still blocked, so that two short touches are really only counted as one.
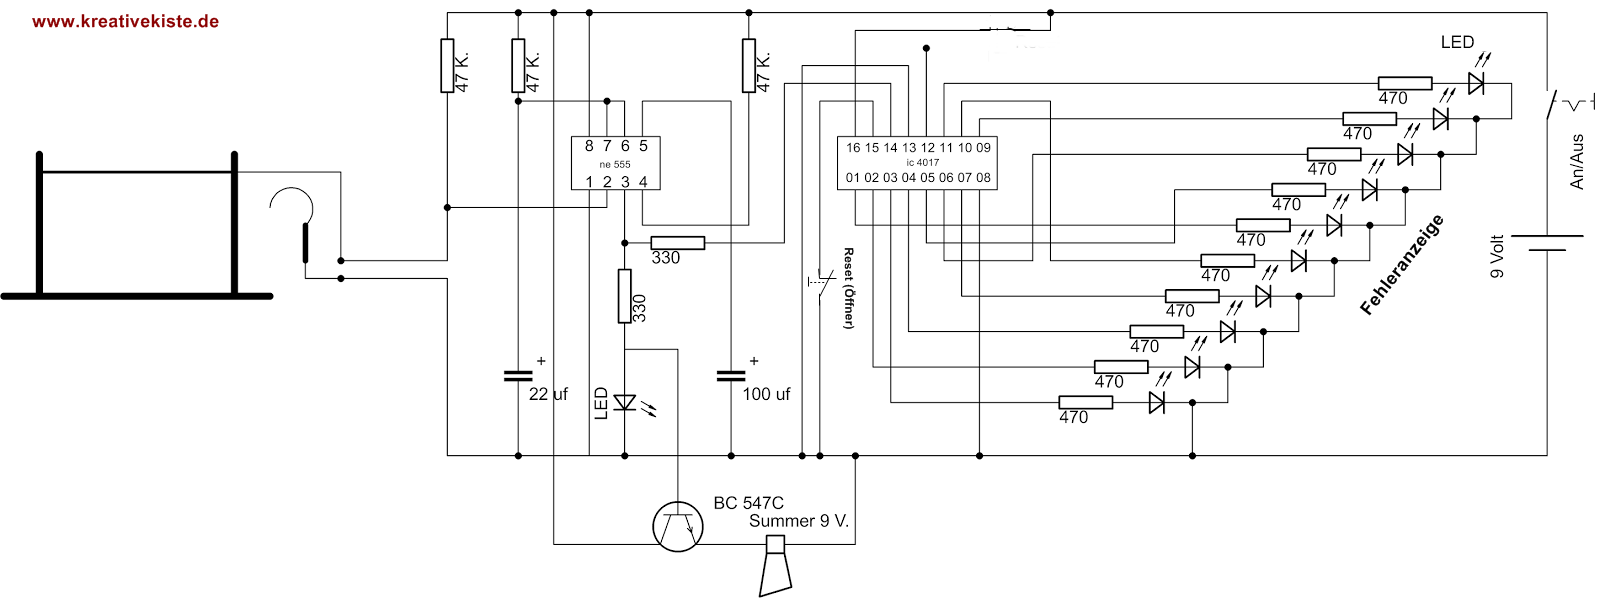
Circuit with error display via 10 LEDs
At the end of the game you can "read" from the LEDs how many mistakes a player made. The NE 555 now works as a debounced switch and sends a "message" to the IC 4017 for every error, which then switches on an LED and thus counts the errors.
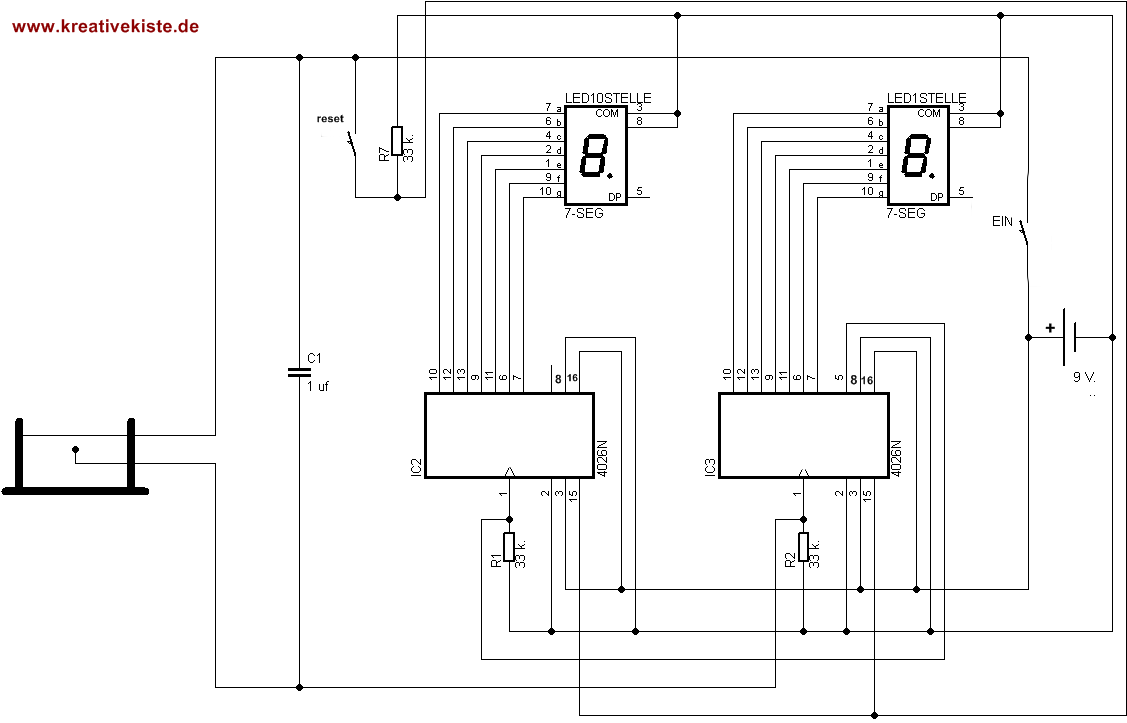
Circuit with error display through 7 segment displays:
The two displays are controlled via two ICs, the 4026. With each pulse at pin 1, the IC automatically switches on a number and only releases the outputs that are required for the current number. He takes over the counting and switching of the respective display. This time there is no IC for debouncing, but a 1 μF capacitor. The capacitor ensures that the voltage is present at pin 1 for a brief moment and that there is only one pulse. Of course, the circuit can also be built with the NE555 for this.
Circuit with error display through finished installation counter:
If you want a hot wire with an indication of many errors, you cannot avoid an advertisement. But if you absolutely cannot solder, have no idea about electronics and want to build a game with a low budget. This circuit could be interesting for him. The finished display with 6 x seven segment displays and a fully wired counter (a Voltcraft DCM220W) costs just 13 euros.

To build the game, only 4 cables need to be plugged in. There are small pins on the back, so-called jumper cables (1-2 euros) are simply plugged onto these pins. The contacts can also be soldered. From pin 2 it goes to a button (these are also available for screwing, 2-5 euros) and to the hot wire. From the hot wire to pin 1 and from the button to pin 3. Everything is ready and the game can begin. With the button the display is reset to zero. 9 volts DC can be connected to terminals 5 and 6 to illuminate the display.
There are also two disadvantages to this circuit. The digit height is not exactly large at 10mm and with an installation dimension of 48x24mm, you have to look very closely to be able to read the display. In addition, the counter (which makes sense) is debounced. Which also means in this case that really very short touches are not counted. But if you want a cheap, quick and easy hot wire with counter, you will have a lot of fun with this circuit.
Circuits with the Arduino:
The Arduino is a programmable mini computer. However, the Arduino has two advantages over many other such systems. First, the hardware around the Atmega chip is completely built. This means that the programming takes place via USB, a fixed voltage regulator allows voltages of 7-20 volts DC, LED, reset button, capacitor solder pins or plug pins etc. everything is ready. Second, the software with driver is also completely finished, so plug it in and it does. The software for programming is relatively simple because a lot of text-based commands are used. If that's still not enough, you can program the Arduino graphically, i.e. by arranging finished blocks with names.
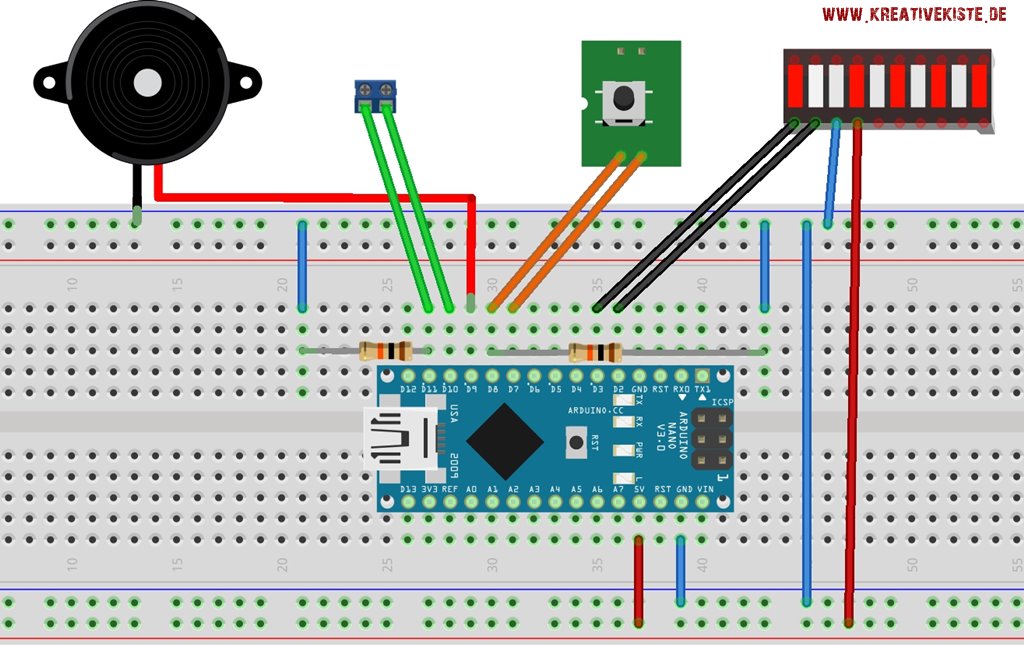
Arduino 10 LED BAR (10 errors with 10 LEDs)
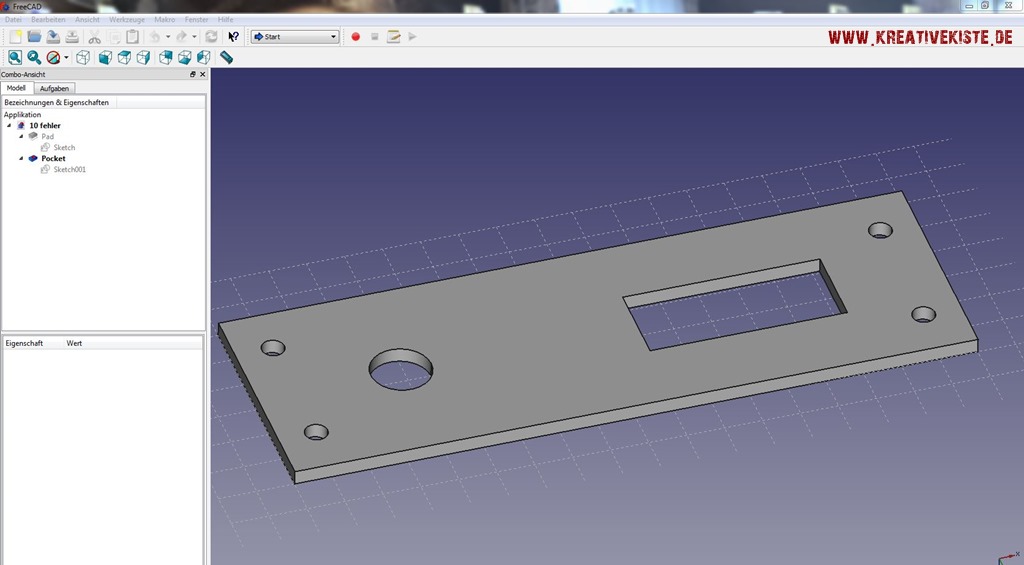
This is my favorite circuit, it is quick and easy to build, but most of all the 10 errors are clearly shown as dashes on the display. The first real LEDs are green, the ninth is yellow and the tenth LED is red. For this display I have created a plate for the 3D printer, in which the display and the button are built in. It looks super nice, because wood can hardly be sawed out as precisely and beautifully as the printer prints the plate. With each error, a buzzer sounds and the LEDs are reset using a button.
This hot wire is also the only one that really counts every mistake !!! All other circuits with the Arduino or the Attiny "pause" after an error between 700 and 1000 milliseconds. This is also good, because otherwise two minimal touches in quick succession count as many errors. In this program code I work with "count change". This means that an error is always counted when the PIN receives a HIGH signal. But only if the eyelet has not touched the wire in between.
Here you will find the code, with Ardublock and detailed instructions on how to build it.
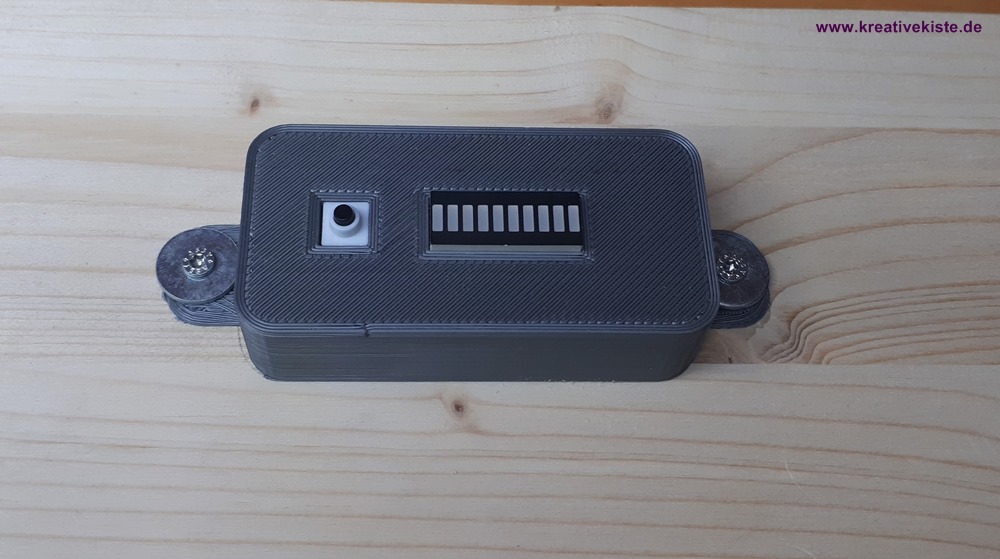
This is how the housing can look, not as a plate but as a real housing, with a reset button.
Arduino and error / time measurement:
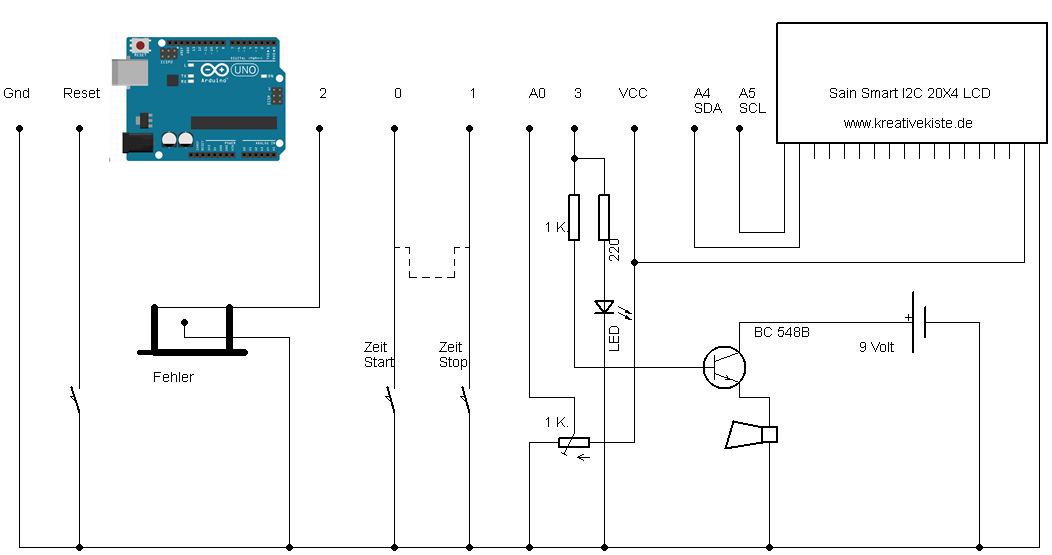
The time for "overcoming" the hot wire is started with a button and stopped with a second button. The errors are counted using a third PIN. To make the game even more exciting, there is a penalty time for each mistake, which can be set using the potentiometer from 1-15 seconds. The player has to decide whether to accept a mistake in favor of a faster time or not. The penalty time is of course set before the game. The result can then look like this, for example. I took this circuit from the biathlon sport, because the evaluation also results from mistakes and time.
The construction of the circuit is quite simple as the Arduino's internal PULL UP resistors are used instead of external PULL DOWN resistors. In this way, the inputs are switched from HIGH to LOW via the minus pole of the Arduino. A series resistor limits the input voltage of the base and switches a buzzer. The display is connected directly to the Arduino.
Here is the hot wire script written in the Arduino IDE.
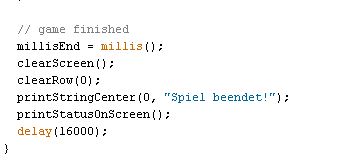
After pressing the Stop button, the display with the result remains for a fixed time. This can be changed via the delay time (here 16000). To cancel a game or the set time, the Arduino reset is connected to GND via a button.
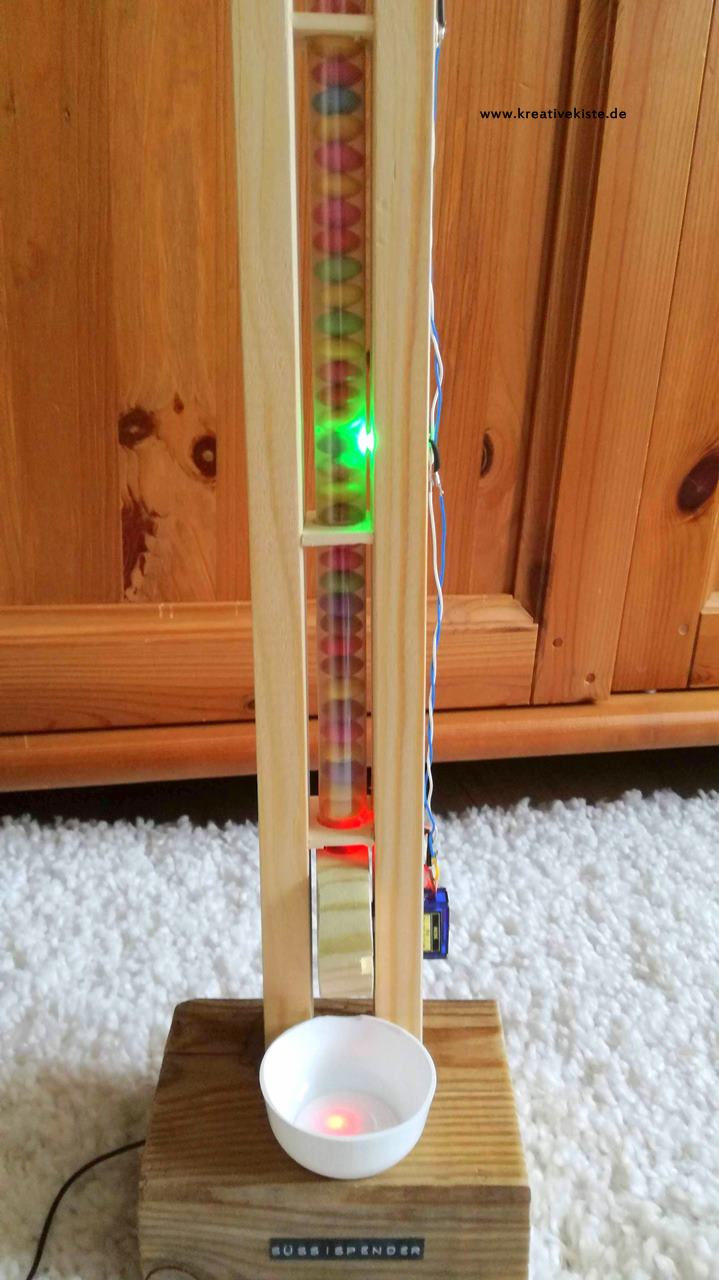
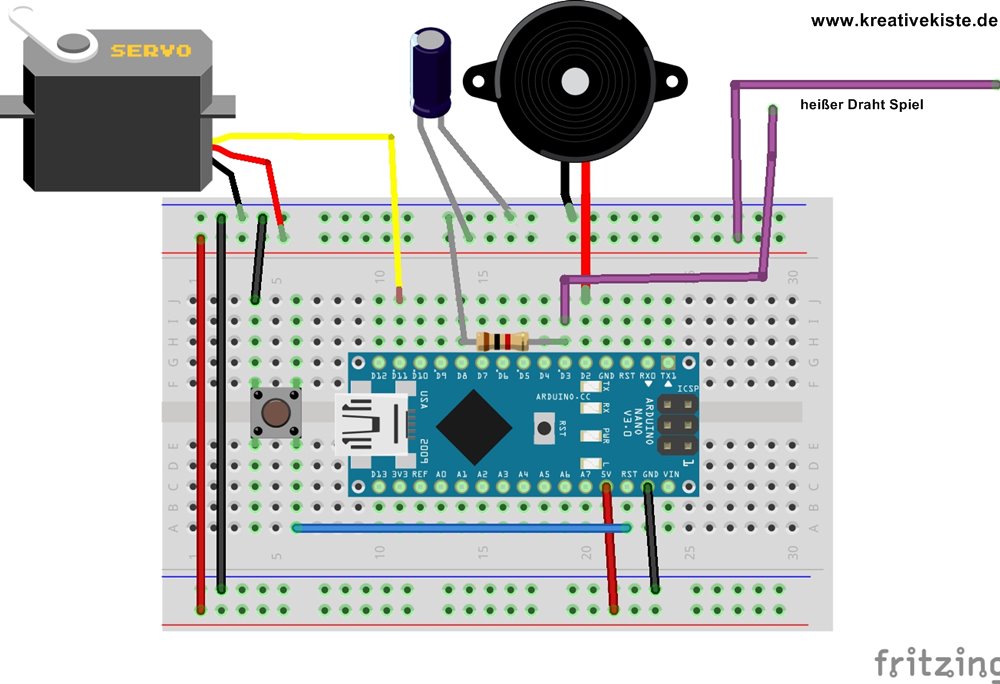
Arduino and reward for the winner:
When I'm at the Arduino, we can do a little more with it. It is clear who won the wire with the shortest time and the fewest mistakes. But only the respect and envy of others. How about if the game gets sweets as a reward right after the game ends? The Arduino counts the error in a variable and after the game it controls your servo motor. The servo turns and conveys sweets from a stainless steel tube. If there are 0 errors, he spins three times, if there are two errors, he turns twice, if there is one error, and if there are more than three errors, the game gets nothing. Three LEDs indicate the errors and a buzzer also sounds with each error.
Here is the program written in the Arduino IDE.
The servo motor is connected to a wooden wheel. A hole is drilled in the wooden wheel that exactly fits a smartie or something else. A stainless steel tube that serves as a dispenser via the wooden wheel.

Franz H. built a particularly beautiful candy dispenser. Nice that the smarties can be seen through the tube.
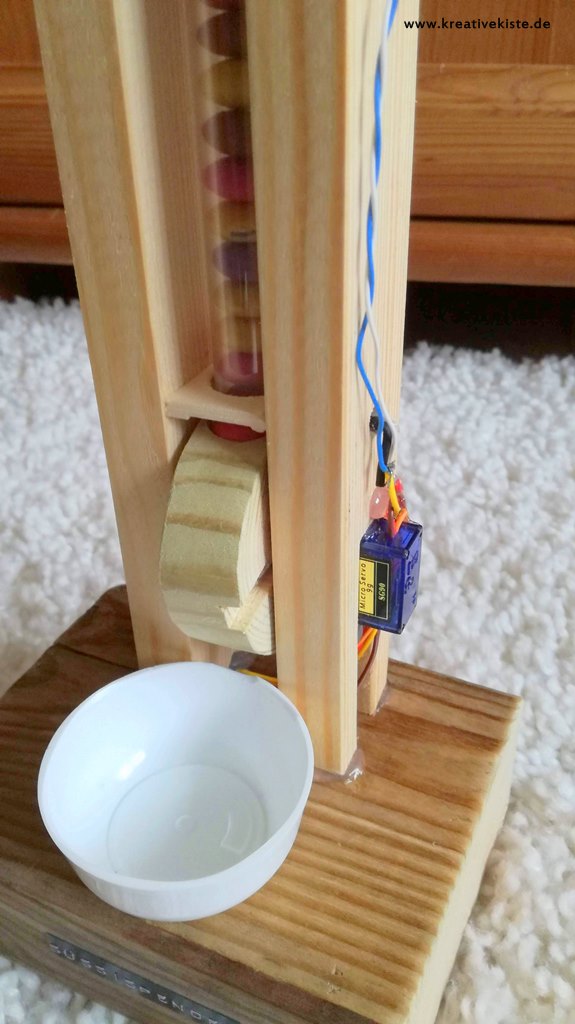
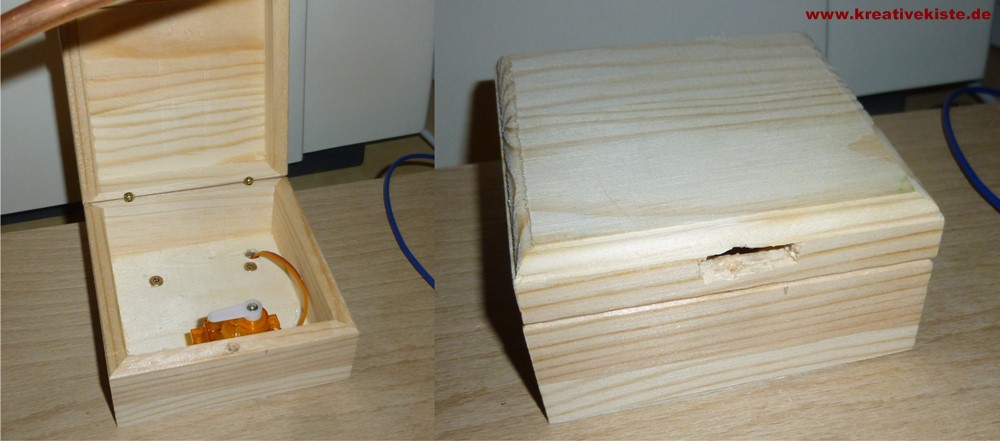
If this structure is too much work for you, it can also be easier. To do this, glue a servo motor in a box, attach the servo arm to it and saw a slot in a small wooden box. If the servo arm is in the slot, the box cannot be opened, the game is done, the servo turns inwards and the box can be opened.
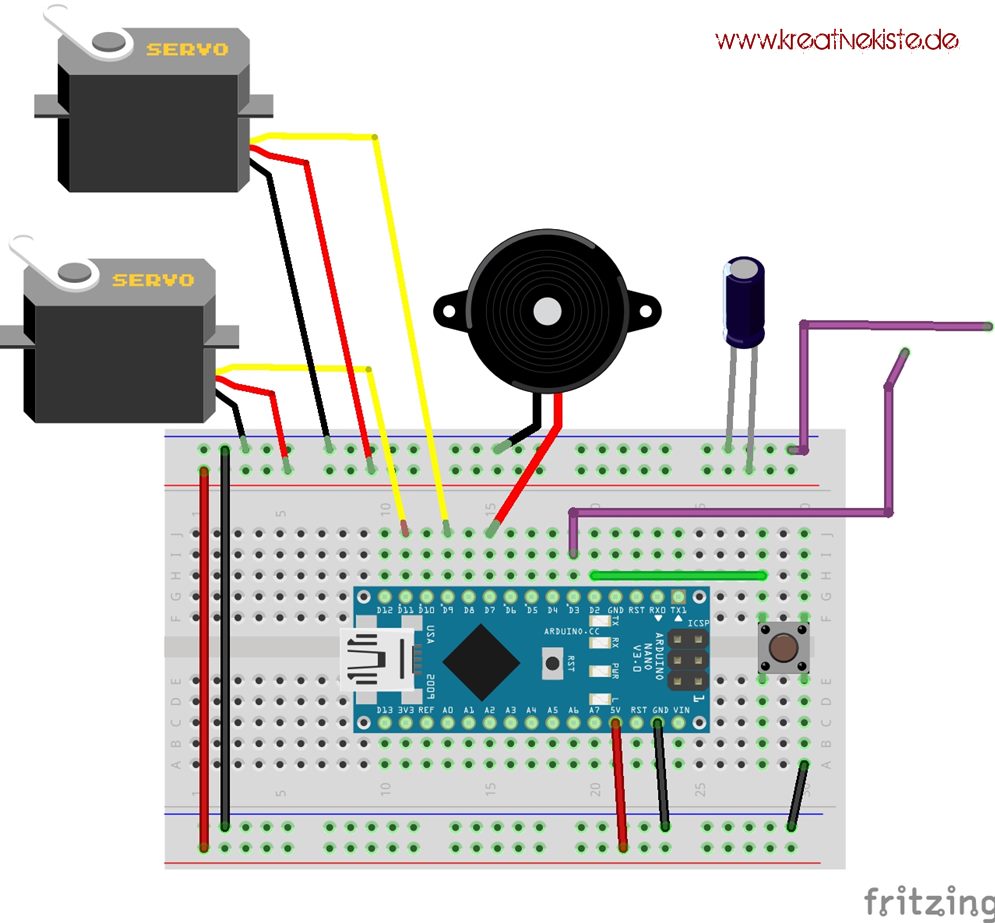
Circuit with Arduino and servo motors as a display even in sunshine:
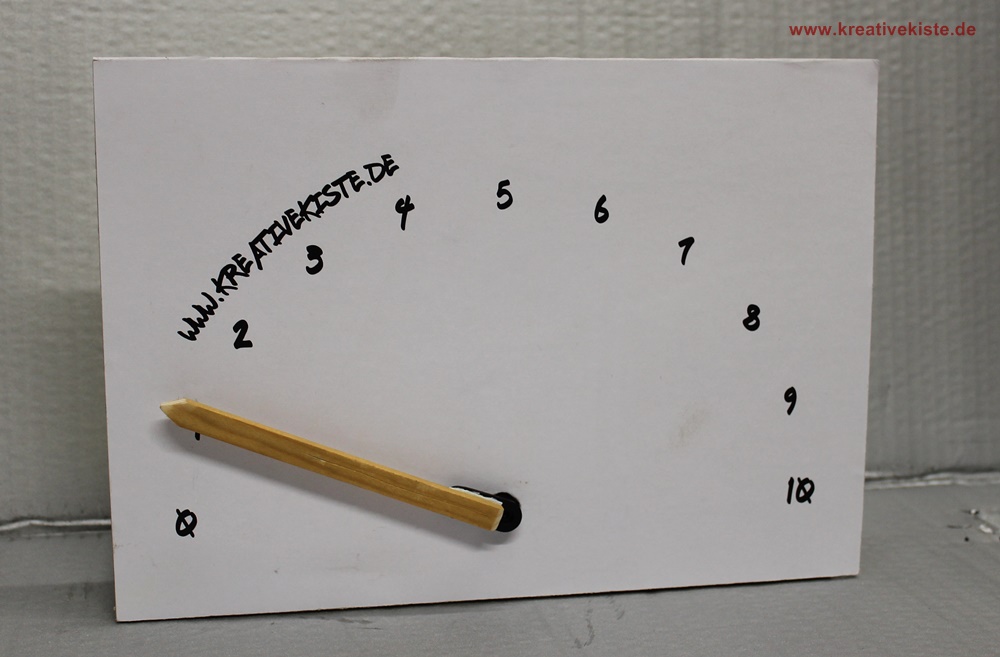
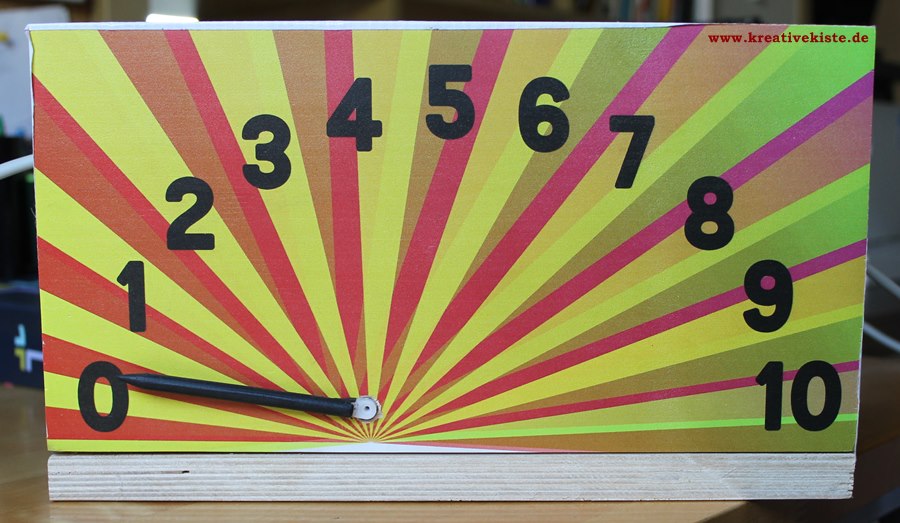
So that the errors and the time can be read well in daylight and daylight-compatible displays with LEDs are very expensive. Can easily be used as a display two servo motors. If the background is designed in such a way that errors and time are easy to read and arrows are attached to the drives, the progress and time can be read wonderfully. Here is an indication of the errors. Depending on how "close" the numbers are, 20 or 30 errors can also be displayed.
Error display code with servo motor
The eye of the hot wire is connected to PIN 3. With a pull down resistor of 1-10 K. Ohm the PIN is always LOW. If PIN 3 receives a HIGH signal via the wire, PIN 11 of the Arduino outputs a PWM signal at the servo. This converts the PWM signal into a pointer position. There is also a beep from the buzzer for one second. Since the servo is connected directly to the Arduino I have a 100 uf. Capacitor switched between plus and minus. The error display is reset via the Arduino's reset PIN. The supply voltage comes from the USB connection, but could also come from Vin.
To save the battery and prevent the servo motor from humming. Is the servo motor "disconnected" after reaching its "error position" and only reconnected when an error has been committed.
Here is the circuit for errors and time display. The servo on pin 9 shows the time. The servo moves 6 degrees every 6 seconds. As above, the servo moves 18 degrees in the event of an error, so 10 errors can be displayed.
This is what the wiring for the servomotors looks like. The button has the following sequence.
- Start (time starts to count and errors are possible)
- Stop (error and time stops)
- Reset (error and time "servo motors" reset to 0)
- -> start
Here is the code written in the Arduino IDE.
Arduino and hundredth stopwatch:
If the seven segment displays are too much to solder (which I fully understand), you can resort to a completely soldered module. The MAX7219 chip controls seven segment displays via 3 pins of the Arduino 2x4. In addition there are plus and minus, so there are only 5 cables that have to be soldered. In addition there are the pins on the Arduino, as well as the start, stop, reset button and the error pin, done.
Here is the Arduino code (don't forget to include LedControl.h beforehand)
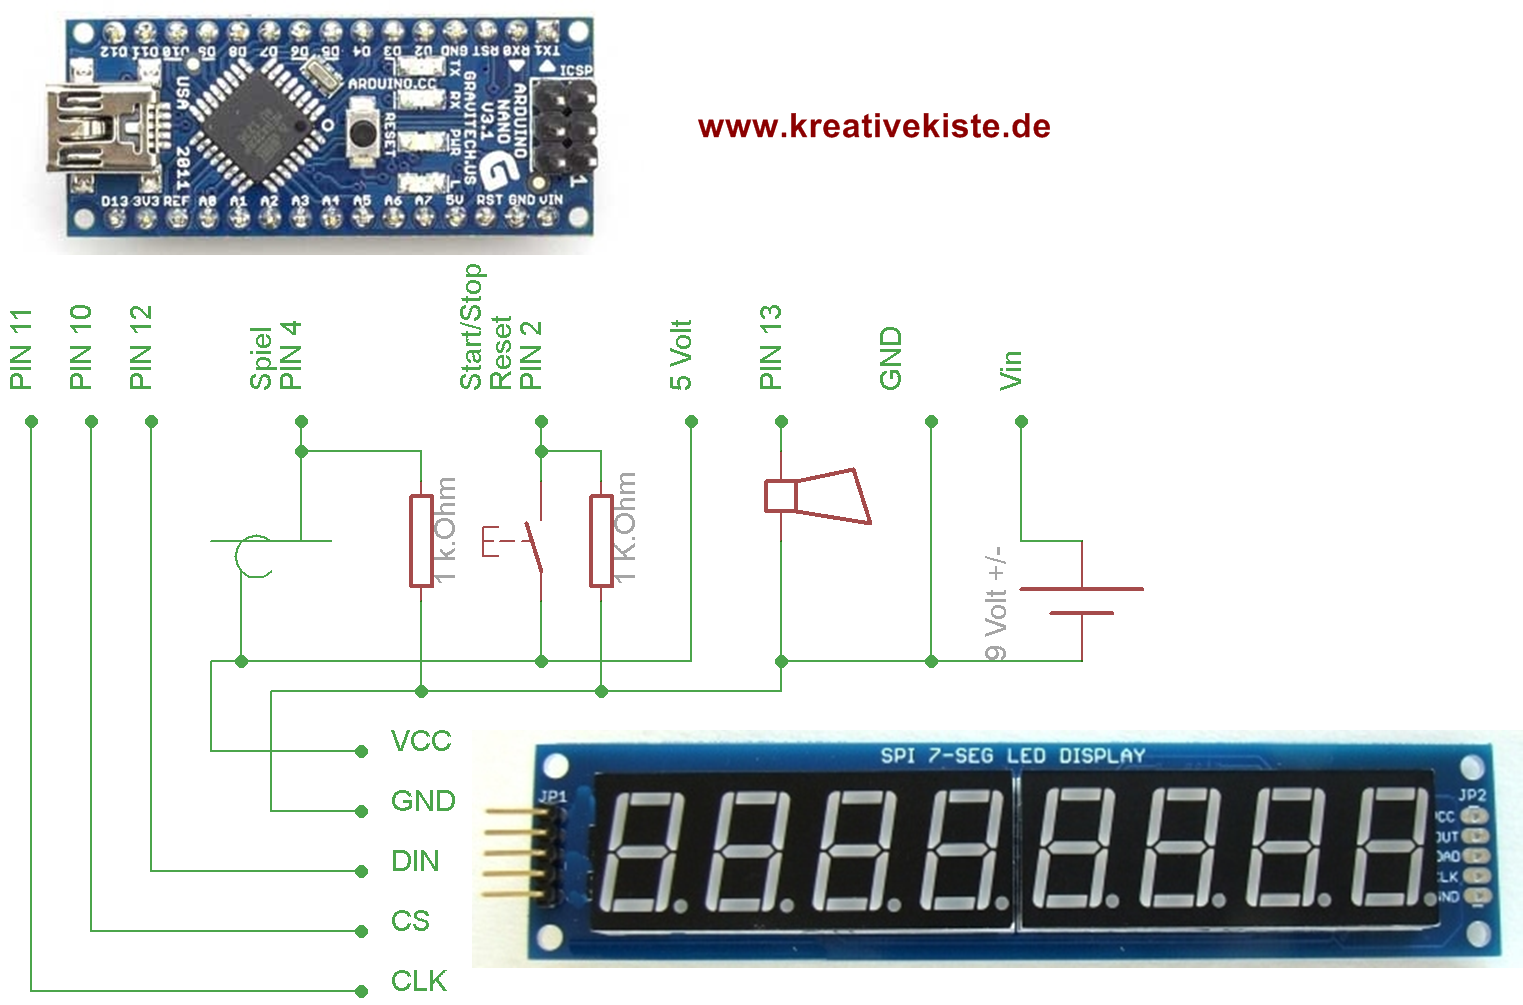
If the start button is pressed, a buzzer sounds briefly, the game starts and the time starts with minutes-seconds-hundredths of a second. If there is an error, the buzzer sounds for 3 seconds and the display is automatically reset to zero. If the hot wire is mastered without an error and the stop button is pressed, the time stops, the buzzer sounds briefly and the results can be compared.
Tip: Since this time measurement is as fast as in Formula One, it matters a lot when the start, stop button is pressed. Therefore, the button should be attached so that it must be pressed with the handle. Instead of a button, a second small tube can be attached, which must be touched with the eyelet, so there are no arguments.
Arduino with error display via NEO pixels
Adafruit's Neopixes are not just pre-soldered RGB LEDs, they also have the control of the LEDs on the board. That means with only 3 or 4 cables all LEDs can be changed in color and brightness. 2 cables for voltage, one cable for control. If you want to connect several neopixel rings, strips or individual pixels together, you have to connect them using a fourth cable.
In the circuit or code for the hot wire, all LEDs light up clockwise with a random color change. Similar to the circle in the PC when you have to wait for an application. If a mistake is made, one LED goes red and stays red, the others change colors in a circle. So up to 12 colors are possible.
![]()
In the breadboard picture by Fritzing I added the Neo Pixel Strips on the right. If these are used, the light does not "run" in a circle but from left to right. the connection remains the same.
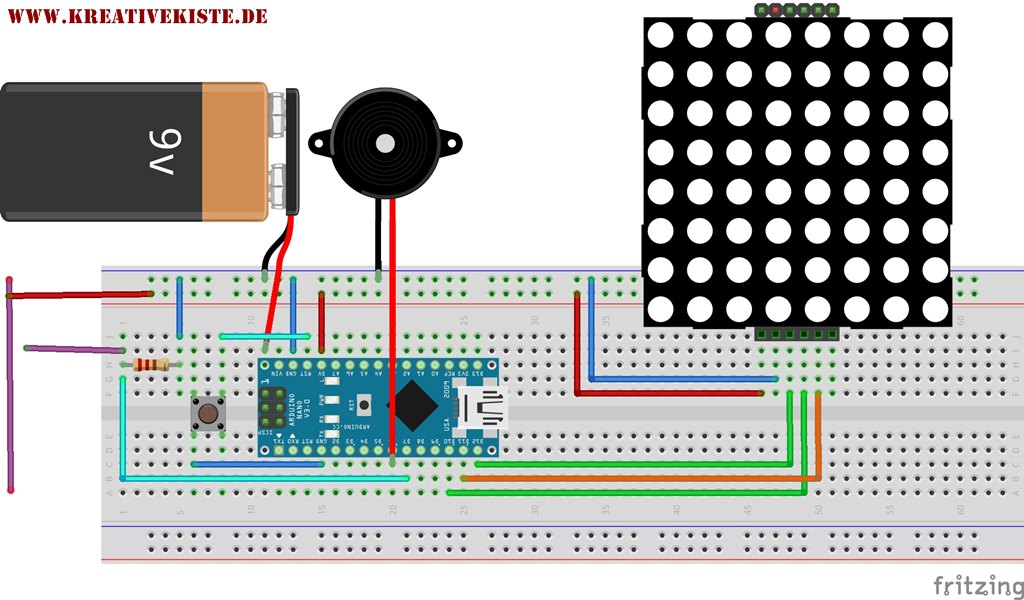
Arduino with error display via 8x8 LED matrix
Seven segment displays are often small, rather dark in inexpensive versions and installing them often takes a lot of effort. The change is a ready wired matrix 8x8 3mm LEDs. It is approximately 3.3x3.3cm in size and all pixels can be easily controlled. The display shows (at least with my code) 9 errors with 2 rows of LEDs. So they are good and easy to read.
This circuit is one of the best to represent errors in my opinion. It is built quickly thanks to the IC2 bus, costs very little with an Arduino Nano clone and, above all, the errors are clearly and reliably recognized.
Arduino IDE code for 8x8 LED matrix
The Arduino code is rel. kept simple, the numbers are shown simply by switching the respective pins on and off. Finished libraries could certainly be used here. So the numbers can be seen in the "full code". A ticker or similar could also be installed.
!!! In the program (fritzing) with which I drew the circuit above, there are no ads with a finished chip, so I simply drew the cables on the matrix. Here, of course, a matrix must be connected, for example with a max7219 chip. Otherwise it doesn't work.
Arduino hot wire for two
So that times or errors do not always have to be laboriously written down or displayed. Here two players play against each other in real time. The game starts with a button in the middle. The game is now ready and must be started with one of the eyelets to the right or left of the wire. So that there is no advantage for a player, a triple piping sounds (beep, beep, piiiiiiep), then it starts. Now every player can turn his display to green. In the event of an error, the display of the respective page then changes to red. The game must now go back to the beginning and switch its display to green again. This continues until a player who has mastered the game without errors. To do this, he touches the eye on the other side. Then the display goes blue and shows the winner.
However, the circuit requires some components, since everything has to be built twice and a digital evaluation must also be done in the program. But it's worth it. There is not so much fun and action often, there is fighting until there is a winner.
Here is the code in the Arduino IDE.
3 circuits with the Attiny 44, 45 and 2013
The Attiny Chips are freely programmable with C or the Arduino IDE. The pins can be switched HIGH and LOW (on and off) or can be used as inputs for digital (HIGH / LOW) or as analog (0-5 volt) signals. The Attiny reacts in a fraction of a second, so that the errors can then be recognized and output on LEDs, buzzers, displays and displays. An Attiny only costs almost 2 euros. The Attiny is not unlike the Arduino, only the entire hardware around the chip is missing. Programming is just as easy as with the Arduino because the same IDE or Ardublock can be used. Bringing the program onto the chip is not quite PLUG and PLAY, as is the case with the Arduino, nor is it rocket science. Instructions are available here on my page. The Attiny only needs a 47 K.Ohm resistor at the reset pin and a 22 uf capacitor between plus and minus, then it is ready to go.
Attiny 45 with LED and buzzer
The wire is touched, PIN 4 receives a HIGH signal. The LED on pin 1 and the buzzer on pin 2 receive voltage and indicate the error optically and acoustically for 1 second. So there is no more discussion about whether a mistake was made or not. Since the LED is dimmed by PWM in brightness and the Attiny can switch 20 milli amps on one channel (mechanical buzzers usually have 15-25ma.), This circuit works almost without external components. So this is a perfectly functioning circuit for less than 5 euros.
Here is the code for the circuit written in the Arduino IDE.
If a button is connected to the reset pin, an LED to pin 0, the input to pin 4 and the code up. If an error occurs, the LED (green) on pin 0 goes out and the LED on pin 1 (red) goes on. The game is now lost and must be reset using the rest of the button. So you only have one chance.
Here is the code for the hot wire game "one chance"
Attiny 2013 with 99 seconds countdown:
An Attiny 2013 has 17 I / O, so you can control two seven-segment displays and still has enough PINs free for a start / stop button, an error input and an LED or buzzer output. If the start button is pressed, the display starts to count down from 99 seconds. If the button is pressed again, the display stops and you can see very well who needed less time for the wire. If there is an error, a buzzer sounds and the game is over. The display is reset to 99 seconds using the reset button.
The PIN assignment can be found in the code and you can find it here.
The resistors are unfortunately not easy to see, they vary depending on the display. I used a very small ad for my experiment. you may need to use 3 x 1.5 volt batteries for larger displays. Nothing changes in the circuitry that the series resistors on the display may become larger. I used a piezo buzzer, which I can connect directly to the Attiny. Mechanical buzzers require a transistor.
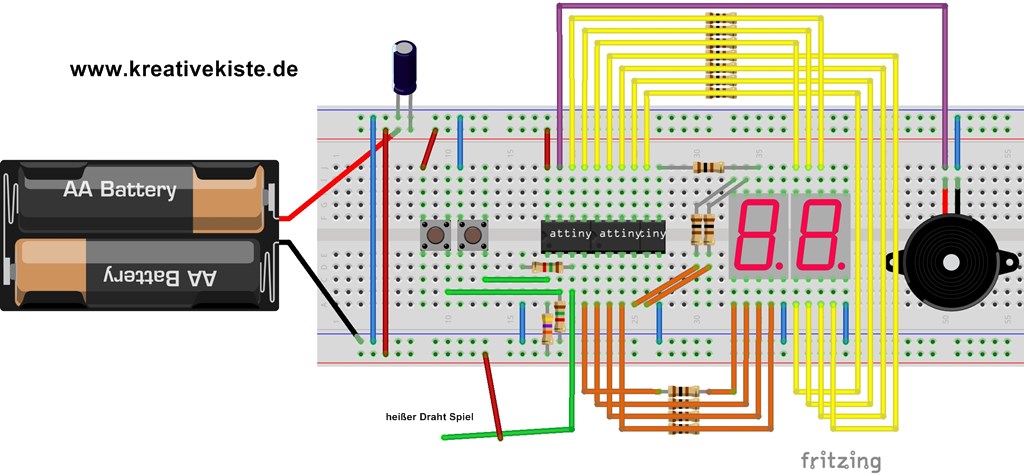
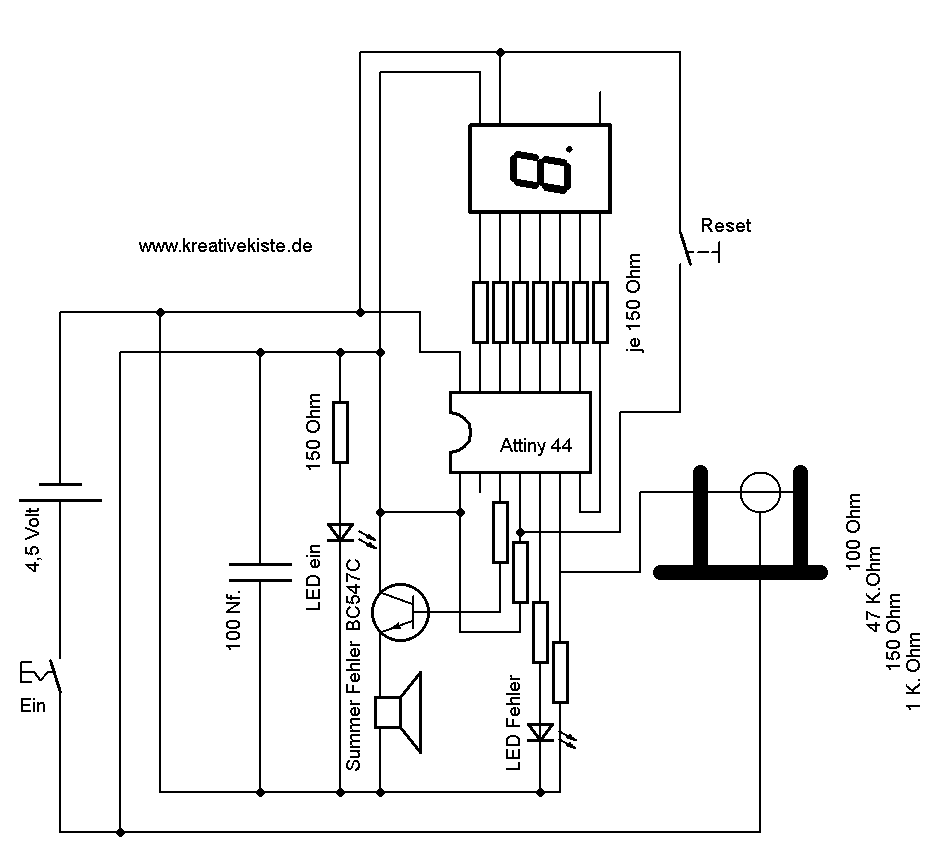
Attiny 44 with 7 segment display for 9 errors:
The Attiny 44 has enough pins to operate a 7 segment display, buzzer, LED and the error input. The great advantage of this circuit is that no further ICs are required. If you want to control 2 displays, you can simply use an Attiny 2313, you save two ICs and a lot of soldering. If you connect the Attiny outputs via transistors, you can also control large seven-segment displays.
Here is the code for the circuit written in the Arduino IDE.
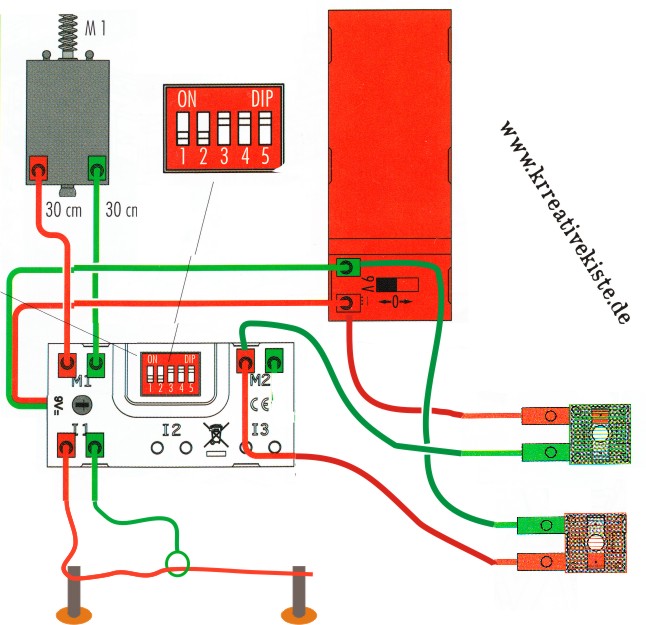
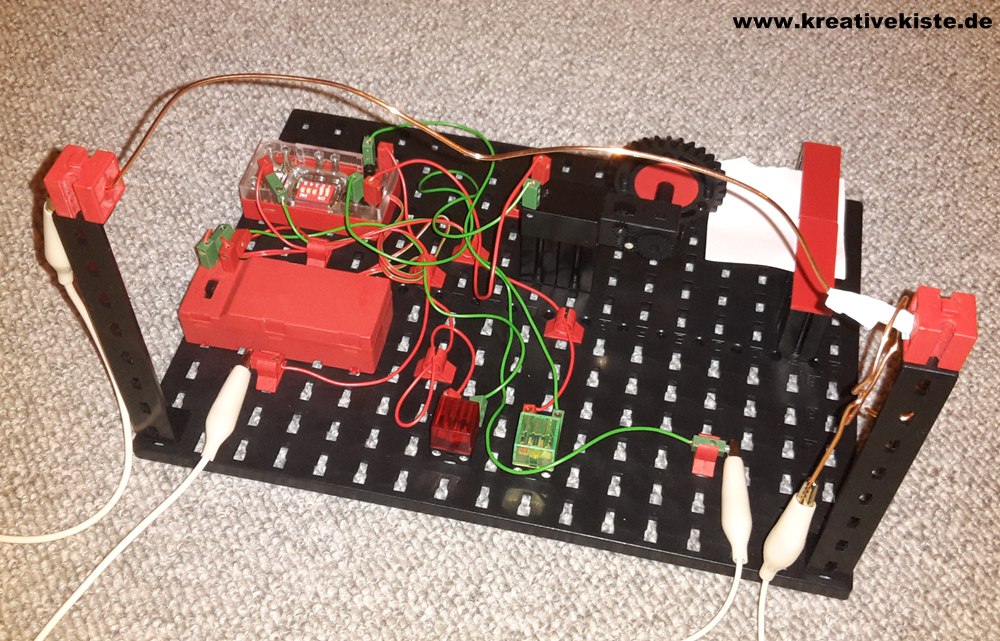
Hot wire with FischerTechnik (electronics)
With the "Fischertechnik - PROFI Electronics 524326) or who has, with the" electronics module ", a simple but well functioning hot wire can be built. The" electronic module "is a controller with 24 fixed programs, it has 2 motor outputs , 3 analog inputs for sensors and a potentiometer. For our game we need the program with the dip switch setting "" 1-2 off / 3-4-5 on "". After switching on the voltage, M2 is switched off, so "minus "Therefore the red lamp lights up. If a mistake is made and input I1 is closed. If M2 is switched on (plus), the red lamp goes out and the green one goes on. When the contact is over, the colors change again. Contact M1 stays on for a set time (via potentiometer) and then goes out. Since I wanted to use as many Fischertechnik parts as possible, I have a buzzer. So I built an acoustic signal myself Gear and clacks. After an error, the motor continues to run for between one and 30 seconds and indicates the error acoustically. The error is only displayed for the time of the error. If that's not enough, you have to connect the lamps to M1 instead of the motor.
If you want to make it particularly great, you should also buy the Sound & Light Set from Fischer Technik. In the event of an error, applause or the like can be played via the sound module.
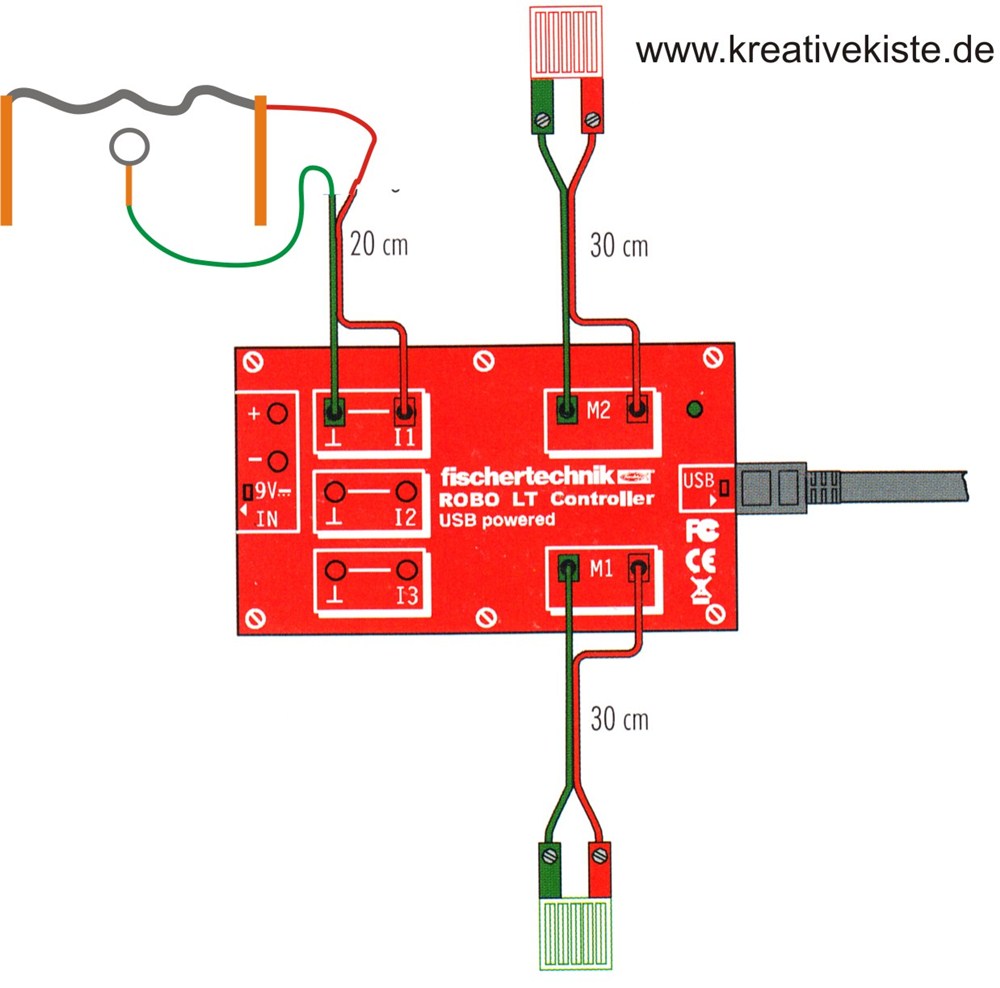
Hot wire with FischerTechnik (roboPro)
The game (hot wire) can be reproduced even more easily and individually with Fischertechnik, with the robo Pro software. I use the version from (Fischertechnik 524370 - LT Beginner Set). The software is sent to the Robo LT controller via a USB cable. There are then two outputs and three inputs. In my version there are two lamps, but it could also be connected to an output of the motor (as above) in order to have an acoustic signal in the event of a fault.
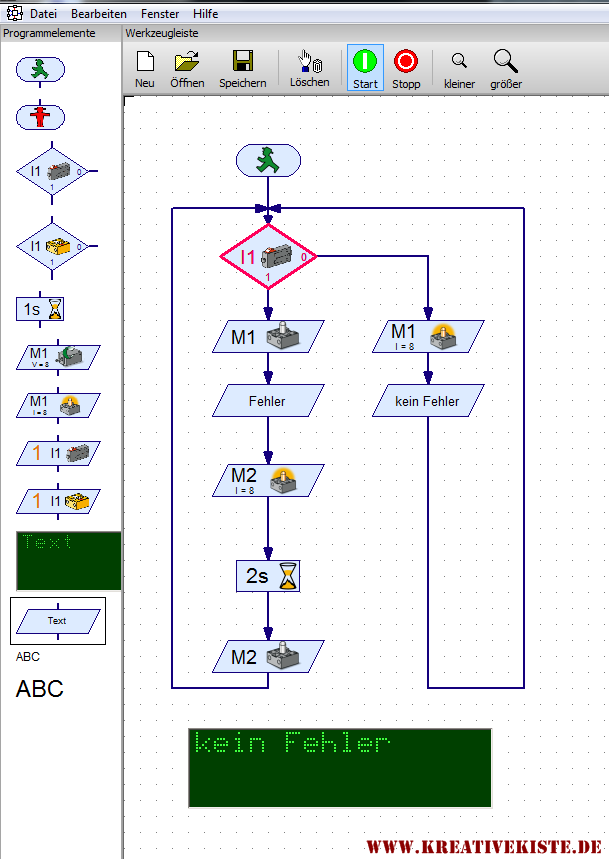
The Fischertechnik software or the program is super simple. In the program of buttons (in the game wire and eyelet), my green lamp on M1 turns on when not pressed (so no error). If the button (wire and eyelet) is pressed in the program (i.e. a mistake made), the green lamp on M1 goes out and the red lamp on M2. The program now waits 2 seconds and then switches the lamps back and waits for another error.
Circuit "one chance":
Just touch the wire and the game is over. Out and over with just one touch. End of story, nothing to add. So that the whole thing is even more exciting, it "knocks" in the background.
As soon as the start button is pressed, a time begins to elapse, which cannot be read anywhere. At some point the circuit changes from "Bum, Bum, Bum" to Buuuuuuhhhhhhh, and the game is lost. The same thing happens when you touch the wire: Buuuuuuuuuhhhhhhh and the game is over. A really great thing because you have to hurry, but a mistake and the game is over.
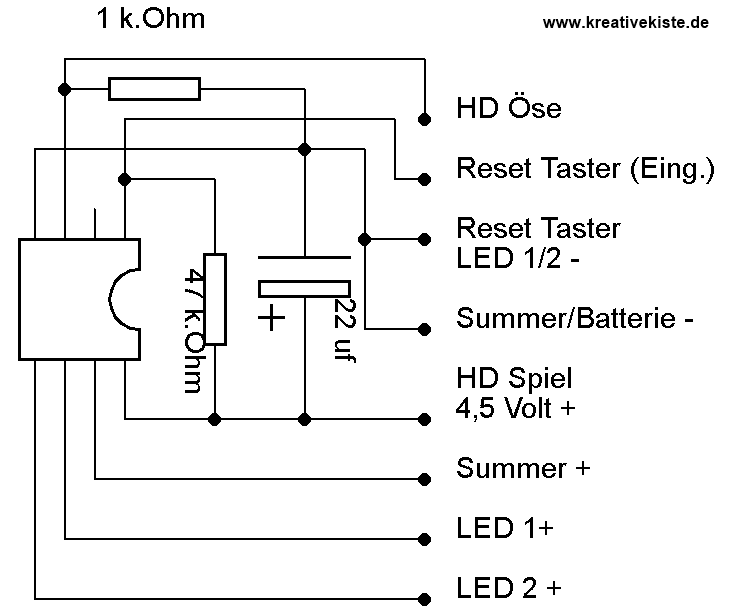
Circuit "one chance" simple version:
Because the "one chance" circuit is such a great thing, it is also available in a simple version. Not only because you don't need two NE555s here, but also because time doesn't matter. If an error is made, the red LED lights up and the game is over. The circuit is reset with the reset button and the green LED lights up again.
Circuit with player lock:
This circuit can be used in two different ways.
Firstly, as a player lock with a 500 μF capacitor, in which the game is only released again after about 1 1/2 minutes and then a new game can be started. With this type, however, the buzzer should be left out, because otherwise it is unbearable :-).
Second, as a timer with a 100 μF capacitor in which an error is displayed for approx. 1 second.
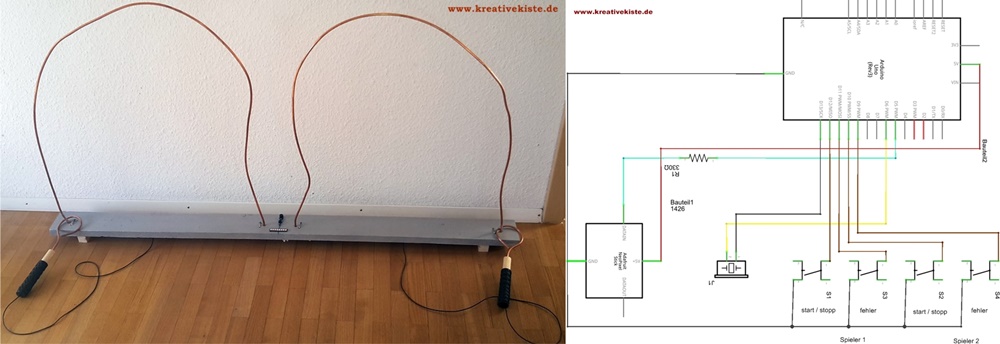
Connect hot wire with computer and screen:
Now we go one step further. We connect our hot wire to the PC and display the errors or the time required on the monitor of the PC, a television or on the projector. You will definitely have the ultimate attention at every fair, birthday or sports festival.
Buttons are attached to the left and right of the hot wire. When the player starts, he pushes a button and the time starts to run. When he has arrived on the other side, he presses a button again and the time stops. Each time the wire is touched, the error status is updated on the monitor.
Before we can start we have to connect the hot wire to the PC. This is possible with a keyboard that is disassembled and instead of the button the hot wire is connected or with an Arduino Leonardo that can pretend to be a keyboard.
Hot wire with Siemens LOGO
The Siemens LOGO is actually a small controller for industry but also suitable for residential buildings. But it is also suitable for the construction of a hot wire. With 120 euros for the module and possibly 120 euros for the LT display rel. expensive.
But if you are electrically fit and electronically unfamiliar, that could be something. Especially since the inputs only work with a low voltage and not with 230 volts, the game is safe.
Here are 4 types. started from the top left.
- An error is made and the I1 turns on Q1.
- An error is made I2, so that this is perceived better, Q2 remains switched on for the set time via the switch-off delay.
- A mistake is made I3, the game is over. Because the self-holding relay remains energized and switches Q3 until it is switched off via reset I4.
- An error is made. I5 errors are counted via counter B004. The errors are displayed in a text field B003. The text field can be switched on via I7 or via a permanent HIGH signal. The rest happens via I6.
![]()
An even nicer solution can be achieved with a TD display. The time is started and stopped via I9 and a surge relay. The errors are counted using a counter as in the instructions above. The time is counted in seconds via a further counter and a pulse relay and displayed on the LOGO or the TD. The message text must be switched on again via an input or a permanent HIGH signal. The reset comes via I8.
![]()
Here is a hot wire game with Siemens logo and a Siemens TDE display.